
Write HL7 messages directly into a database
What this tutorial builds
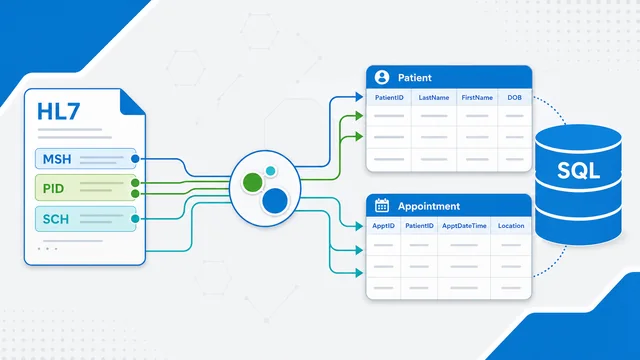
In this tutorial we create an Integration Host workflow that listens for HL7 messages over TCP, extracts patient and appointment values from SIU S12 messages, and writes those values into a SQL Server database. The same pattern works with other database providers once the connection string and SQL are adjusted.
The example uses a simple database with Patients and Appointments tables. The workflow first writes or updates the patient, returns the database-generated patient ID, and then uses that ID when writing the appointment record.
Before you start
- HL7 Soup and Integration Host installed.
- A SQL Server database, or another supported database provider.
- The sample database script from the tutorial download, or your own Patients and Appointments tables.
- An SIU S12 HL7 message to use as the sample message for bindings.
Fields used in the sample SIU S12 message
The tutorial uses patient details from PID and appointment details from SCH. Your SIU messages may use slightly different fields, so it is worth checking your own message before you start binding values into the database query.
Step-by-step guide
- Create or open the sample database. Start with the simple Patients and Appointments tables. The sample database keeps the tutorial focused on the HL7 workflow rather than database design.
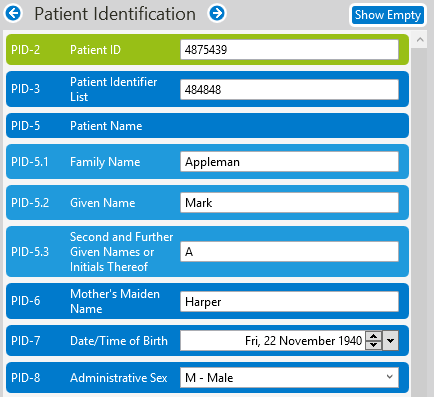
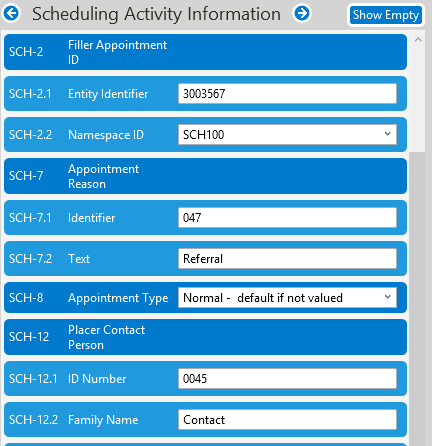
- Identify the HL7 fields you want to write. In the sample SIU S12 message, the tutorial uses the patient ID, surname, first name, and date of birth. For the appointment, it uses the appointment ID from SCH-2 and appointment dates from SCH-11.4 and SCH-11.5.
- Check where your appointment dates are stored. SIU messages can place appointment dates in different locations. The tutorial highlights SCH, AIS, AIL, and AIP so you can check your own messages before binding the values. The Scheduling over HL7 guide explains how those segments fit together.
- Create a new Integration Host workflow. In the Integration Workflow Designer, use a TCP receiver. The tutorial keeps the default local setup and receives HL7 messages on port 22222.
- Insert a sample SIU S12 message. Right-click the incoming HL7 message and insert the sample SIU S12 message. This gives the binding tree a real message structure to work with.
- Add a database query activity for the patient. Add a new Database Query activity, name it Write Patient, select SQL Client, and add your connection string. A local SQL Server database or an Azure SQL Server database both work for this example.
- Use SQL parameters, not pasted values. Add a parameterized insert query for the Patients table. Parameters are safer than putting HL7 values directly into the SQL query because they avoid SQL injection problems.
- Bind the HL7 patient values to the SQL parameters. Use the binding tree to drag the family name, given name, date of birth, and patient ID into the matching query parameters.
- Run an early test. Save the workflow, send a sample SIU S12 message from HL7 Soup, and check the workflow logs. Then open SQL Server Management Studio and confirm the patient record was written.
- Format the HL7 date values for SQL Server. HL7 date formats are not the same as SQL Server date formats. Right-click the birth date binding and use Format Dates and Number to choose a database-friendly date format.
- Return the database-generated patient ID. Update the patient query so it can insert or update the patient and output the database identity field. In the database activity, configure the result as a single value called DatabasePatientId.
- Add a second database query activity for the appointment. Add another Database Query activity named Write Appointment. Bind SCH-2 as the appointment ID, SCH-11.4 as the start date, and SCH-11.5 as the end date.
- Use the patient ID from the first database activity. The appointment should use the database-generated patient ID from the Write Patient response, not the external patient ID from the incoming HL7 message.
- Add the database patient ID to the HL7 response. Set the first activity to return a custom response and append the database patient ID into the outgoing HL7 response so the sender can see the generated ID.
- Test, fix date formatting, and test again. If the workflow reports a date/time error, format the appointment start and end date parameters as well. Resend the SIU S12 messages and confirm the patients and appointments are created.
Database query and parameters
The database activity uses SQL parameters for the HL7 values. This keeps the query safer and makes the bindings easy to see and maintain.
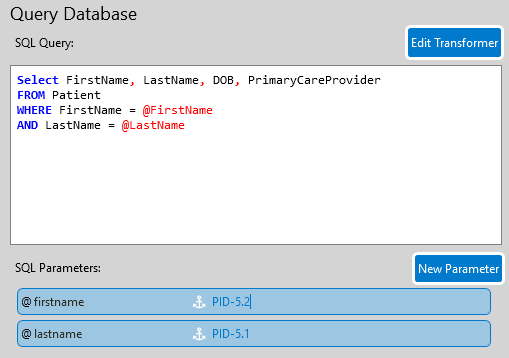
@firstname and @lastname, then bind them to the matching HL7 fields.If SQL Server reports a date/time conversion problem, format the HL7 date value before it reaches the query parameter. The birth date and appointment start/end dates usually need this check.
Useful checks and troubleshooting
- Date and time errors: format the HL7 date fields before writing them to SQL Server. Do this for the birth date and the appointment start/end dates.
- Duplicate patients or appointments: use an insert-or-update query if your workflow may receive updates for records that already exist.
- Different SIU message layouts: check SCH, AIS, AIL, and AIP in your own message before choosing the appointment date fields.
- SQL safety: use query parameters for HL7 values instead of concatenating values into the SQL string.
- Data cleanup: use formatting options for names, dates, and encoded fields before writing values into the database.
Related tutorials
- HL7 scheduling activity from experience
- Scheduling over HL7 from experience
- Integration Host Getting Started
- Integration Host Getting Started Part 2
Video Transcript
Read the full transcript
In this tutorial we're going to show you how to send values from an HL7 message to a database. We'll set you up to have an always-running receiver of HL7 messages that will extract your desired fields, format them, and write them to a SQL Server database. Our example will be with SQL Server, but other databases are very similar.
Here's our scenario. I would like to receive SIU S12 HL7 messages, which are new appointments, and create patients followed by appointments in our database. We've included a simple script that can generate this dummy database for you, so you can easily follow along.
Let's start by taking a look at our dummy database. It's very simple. We just have a Patients table and an Appointments table, but it illustrates a very common scenario when working with HL7. Running the process will be HL7 Soup's Integration Host. If you're new to it, we've got two getting started tutorials that would be worth checking out after this video.
Let's head over to HL7 Soup and take a look at an SIU S12 message and at the fields that we'll be extracting. I've already added some highlighters to indicate which fields we'll be using. You'll see we've got a couple of SIU S12 messages as our first one and the second one.
For this example, we're going to extract the patient's ID, their surname, their first name, their date of birth, and then later on we're going to create an appointment for that patient. For the appointment dates, we're going to be using SCH-11.4 and SCH-11.5 for our data. There are a number of places you might find the appointment date. If I click on here, we'll see also highlighted is the AIS, the AIL, and the AIP. Depending on your message, you might find your dates in different locations, but for the two messages we've got here, both of them have their dates in SCH-11.4.
Let's head over to Integration Host and create our workflow. Here we are in the Integration Workflow Designer. We're going to receive our messages by TCP, but I've got some choices. I could get it from the directory scanner or HTTP receiver. There are other options as well. I'm just going to take the defaults. It's going to come in on port 22222 to my local machine, and the message type will be an HL7 message that we're going to be receiving.
I'm just going to right-click on the message and insert the sample message, and I'm going to insert sample SIU S12. This is so we've got a message to base our bindings on, but you'd use your own one if you have one. Otherwise the sample message is an excellent resource for this.
Now let's create an activity to write this data into a database. I'm going to click here to add a new activity, and we're going to change that across to a database query. We'll give it a name, Write Patient, and then choose which data provider we're using. We are going to be using SQL Server, so SQL Client, and then I just need to add in the connection string.
There are some example connection strings available for you if you need some help creating your connection string. You can just double-click on them to use them, and you just need to change the password and the user ID. I happen to have mine on the clipboard, so I'm just going to paste it into the message. In my case, I'm accessing SQL Server in Microsoft Azure for my data source, but a local database would also be fine.
Now we've got our connection string, it's time to add in the query. Again, I'll just copy that and paste it in. Let me just quickly explain the query. We're inserting into the Patients table. We're adding the fields FirstName, LastName, Birth, and ExternalPatientId, and the values will be adding our parameters into that query.
Because I've added parameters, it's listed the parameters down below here. You could actually put the values directly in your query if you wanted to, but then you're at risk of a SQL injection attack. If you do need to add your own parameters, either click the New Parameter button here or just simply type it into the query, and you'll see that the parameter is automatically added below. I'll get rid of that dummy parameter because we don't need it.
Now I just need to populate the values of these parameters. Because we added in the message template earlier, I can use the binding tree here and find the fields that I'm after. We wanted the patient's name, then drag the family name to the last name field, drag the given name, and the date of birth. We were using PID-3 for our patient ID.
That's the super basics done. Let's save and close, and I'm going to give this a quick try at this stage. You'll see our workflow is up and running and ready to receive on port 22222. I'm going to head across to HL7 Soup and send through one of these two messages, and we can see it successfully come in.
Let's go back into the editor and take a look at what we've got. Back in the Workflow Designer, I like looking at the logs inside the Workflow Designer. We can see we received our HL7 message and we wrote into the database using this query, and here's our parameters going in. That all looks very successful.
Let's actually go to the database and take a look. I'll bring up SQL Server Management Studio and find my table. I just wrote to the Patients table, so I can right-click on that and select the top rows. There we go. Our message was written to the database with the values that we wanted.
Some quick things of note. The patient ID is an ID generated inside the database, so we're going to try and return that back to our message and use that again when we create the appointment. It's the database's patient ID, and we're treating the incoming patient ID as the external one, because that's coming from another system. Also, this changed date and UID I use for bringing the data out of the database, so they are not required for this particular sample.
Another quick thing of note: HL7's date format is different from SQL Server's, so we had better make sure the values that we're writing into that are actually correct. This one does seem to have worked, but that won't always be the case, so we'll make sure we format that correctly.
Back to the Workflow Designer, back to the database activity, and I'll start by adjusting the format of the birth date. We right-click, select Format Dates and Number, and select the date format that is suitable for a birth date.
I want to be able to get back that patient ID that was generated in the database, so I'm going to upgrade this query now and paste in a bit more functionality. I'm going to be able to handle if the patient already existed in the database. I've got an if for that, which checks if it already existed or not, and if it does already exist it will update it rather than insert it.
We see that it's used the same parameters, so the parameters come across anyway even though I pasted. Also, we put an output after the insert or the update, so it outputs the identity field, PatientId, from the database, and we'll use that to write into the appointment.
Let's tell the activity we are getting a result back, and we will just call that DatabasePatientId. We are just returning a single value. If you're returning a record set with multiple columns, just list all the columns here, comma separated, and they'll become accessible in your bindings.
Let's now add another activity, and we'll write in the appointment. Again, I'm going to choose a database query. We'll call this Write Appointment, and again SQL Client. We'll just paste in our database query. You'll notice the samples vanish as soon as I paste it in, and then we just need our new query.
Here's what I've written earlier. Again, we are using parameters to get our values. Here's the query to add the appointment. Similar to the last one, it's checking if it already exists, and it updates it if it already does rather than inserts. It's already got the parameters in place, and you can see the parameters are being populated down here from the query.
Now I just need to populate those, so I choose the bindings. Out of the incoming message, we need to get the appointment ID from SCH-2, the start date from SCH-11.4, and the end date from SCH-11.5. Now we just need the patient ID. We can't get that from the incoming message. We have to change it to the response of our Write Patient activity, and there's the ID that we created. We can just drag that in as our patient ID. Now it's going to use the patient ID generated by the database when it writes the appointment message.
Let's also make it so the response that we send back via HL7 includes that patient ID. I go back to the first activity and choose the response type to return a custom response. Scroll down, and I'm just going to append to the outgoing message another character. I'm going to get the source from that patient response again and drag that into the outgoing message that we're going to be sending back to the sender.
I'm just going to click Save and Close and try this out. Back to HL7 Soup, I'm going to hit Send, and we've got an error coming through. Double-click on it to take a look. I could look in the logs as well, but you can see there's a problem setting the date and time. I know what that's going to be.
Close this and head back to Integration Host. Edit the workflow. Although we configured the date correctly for the birth date, we didn't do it for the appointment dates. Let me go to the parameters here, and for the end date choose Format Date and Number and use our database-friendly date format. Do the same for the start date.
Let's save this and retry again. I'll go back to here, get rid of that message, select the first SIU S12, and hit Send. Now we've got a success and another success. If we look at the responses that have come back, and I double-click on them, we can see the ID has been written into the field that we got from the database.
Let's head across to the database. We'll refresh our patients, and now we've got two records. We'll also have an appointment. That's great. We've got a successful workflow.
Other things that you might want to try: the formatting of your first name and last name. Right-click Format is available to make sure your data is correct. Look specifically for your title casing and the nickname casing for getting those surnames right.
You can also extract Base64-encoded files out of an HL7 message. You might have a document embedded into the message or something like that. Use the Base64 encoding to get that out and put it into a blob field inside your table, or a large text field.
As always, if this video has helped you, please do us a favor and give us a like. Consider subscribing to our channel. Don't forget to take a look at the getting started tutorials for Integration Host, visit our tutorials page, and please feel free to give us any comments or ask us any questions you may have about the product. Thank you.