
Convert CSV and Excel files to HL7
What this tutorial builds
This tutorial creates an Integration Host workflow that watches a folder for CSV files, reads each row as a record, maps the row into an HL7 patient message, and writes the generated HL7 files into an output folder. It is designed as an always-running process, so new CSV files can be dropped into the folder whenever they arrive.
The useful parts are the details around real-world CSV data: making each output file unique, formatting dates into HL7 date/time values, converting friendly values such as Male into HL7 lookup values such as M, and escaping HL7 structural characters such as ampersands in address fields.
Before you start
- HL7 Soup and Integration Host installed. The trial is enough to follow the workflow.
- A CSV file, or an Excel file saved as CSV, with one patient or record per row.
- A target HL7 sample message. Use a real destination sample when you have one, or start from the HL7 Soup sample messages.
- Source, backup, and output folders for the folder-scanning workflow.
- Basic comfort with HL7 fields. If HL7 is new to you, start with Introduction to the HL7 Soup Editor.
Sample CSV and HL7 shape
The tutorial uses a simple CSV where each row contains one patient. Your real file may contain more fields, but the same mapping pattern applies.
PatientID,LastName,FirstName,DOB,Gender,AddressLine1
1001,Brown,Sam,19840312,Male,Cnr High & Main
1002,Smith,Mary,19780605,Female,23 Main St
The target HL7 message uses the CSV values in the patient identification fields. The workflow also inserts current message time and a unique message control ID.
MSH|^~\&|HL7Soup|Instance1|HL7Soup|Instance2|202407271208||ADT^A04|1|P|2.5.1
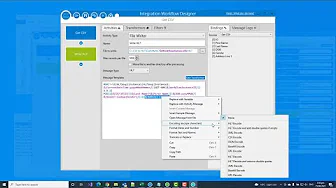
PID|1||1001^^^MR||Brown^Sam||19840312|M|||Cnr High\T\MainThe & in the CSV address is not safe as plain text in HL7 because it is a subcomponent separator. HL7 encoding changes it to \T\ so the address stays in one field.
Step-by-step guide
- Prepare the folder structure. Create a source folder where CSV files will arrive, a backup folder where processed CSV files can be moved, and an
Outfolder for generated HL7 files. - Create a new Integration Host workflow. Click New Workflow and choose a Directory Scanner because the CSV files are coming from the file system.
- Configure the CSV receiver. Name the receiver
Get CSV, point it at the source folder, set the file filter to CSV files, and leave Keep waiting for more files to be added enabled so the workflow keeps running. - Set the inbound message type to CSV. Open the CSV in Notepad or another text editor, copy the header row, and paste it into the message template. Integration Host uses that header to create the CSV binding list.
- Skip the header row and move processed files. Tell the scanner that the file has message headers so the first row is not processed as data. Move the processed source file to the backup folder so it can be reprocessed later if needed.
- Add an HL7 File Writer activity. Add the next workflow activity, name it
Write HL7, choose the output folder, and set the message type to HL7. - Make each output file unique. If every record writes to
MYHL7.HL7, all records can end up in one batch file or overwrite each other depending on settings. Insert theWorkflow Instance IDvariable into the file name, or use a unique field from the CSV. - Load an HL7 message template. Use a real sample from the system that will receive the message, or choose a sample such as Register the Patient. The template gives you the HL7 shape that the CSV data will populate.
- Set the HL7 message timestamp and control ID. Insert
Current Date TimeintoMSH-7and format it as an HL7 date/time with seconds. InsertWorkflow Instance IDintoMSH-10so every generated message has a unique control ID. - Simplify the HL7 sample. Remove next-of-kin, visit, or other sample segments if the CSV does not contain those values. This keeps the output focused on the fields you can actually populate.
- Map CSV fields into PID. Drag patient ID, first name, last name, date of birth, gender, and address line 1 from the CSV binding list into the matching HL7 fields. First name usually goes into given name, and last name goes into family name.
- Format the date of birth. Right-click the date of birth binding and format it as an HL7 date. A CSV or Excel date value often needs formatting before it is safe to put in PID.
- Run an early test. Save the workflow and let Integration Host process the sample CSV. If Excel still has the CSV open, the workflow may report that the file is locked. Close Excel, clear the test logs if needed, and run it again.
- Open the generated HL7 in HL7 Soup. Check that one CSV row has become one HL7 message, and that names, dates, gender, and address values landed in the expected fields.
- Create a gender lookup table. In Integration Host lookup tables, create a table named
Gender. Map source values such asMaletoM,FemaletoF, and blank or unknown values toU. - Apply the lookup table to PID-8. Right-click the gender value in the HL7 template, choose Truncate and Replace, and select the
Genderlookup table so friendly CSV values become valid HL7 values. - Encode address values for HL7. Right-click the address binding, choose the encoding options, and select HL7 encoding. This protects characters such as
&,|, and^when they appear inside CSV data. - Reprocess the sample and verify. Copy the original CSV from the backup folder back into the source folder, refresh the logs, and confirm that values such as
MaleandCnr High & Mainnow become valid HL7 output.
Key moments from the tutorial
Lookup tables and escaping
CSV values are often written for people, not HL7 parsers. Male is easy to read in Excel, but PID-8 normally expects a coded value such as M, F, or U. A lookup table lets the workflow translate those values automatically.
CSV value,HL7 value
Male,M
Female,F
,U
Escaping is just as important. HL7 uses characters such as |, ^, and & as part of the message structure. If one of those characters appears inside a CSV value, encode it before writing it into HL7.
For the tutorial address Cnr High & Main, HL7 encoding writes Cnr High\T\Main. That tells the receiving HL7 system that the ampersand is data, not a separator.
Useful checks and troubleshooting
- The CSV file is locked: close Excel or any other editor that has the file open before Integration Host tries to process it.
- No HL7 files appear: check the Directory Scanner path, file filter, and workflow status. The source file must match the CSV filter and the workflow must be running.
- All records land in one output file: add a unique variable such as
Workflow Instance IDto the file name, or set the writer up for the file shape your destination expects. - The downstream system picks up partial files: write to a working folder first, then move the completed file to the pickup folder after processing.
- Gender is invalid in HL7 Soup: apply a lookup table so words such as
MaleandFemalebecome HL7-coded values. - The address splits into several HL7 components: apply HL7 encoding to fields that may contain separators such as ampersands, pipes, or carets.
- Dates look wrong: format the message timestamp as an HL7 date/time and the date of birth as an HL7 date before writing the message.
Related tutorials
- Send HL7 messages to Excel / CSV
- Convert XML messages to HL7
- Add repeating HL7 values to CSV
- HL7 escape characters
- Integration Host Getting Started
- Return to the HL7 tutorial directory
Download 30 Day Free Trial of HL7 Soup
Video Transcript
Read the full transcript
This tutorial will take you through the steps in Integration Host for mapping values from a CSV file, or an Excel file saved as CSV, into an HL7 message.
We use custom formatting, lookup tables, and HL7 encoding to create a file directory that is constantly monitored for new CSV files.
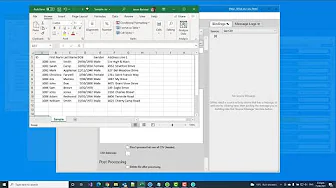
Here I have a basic CSV message with each row representing a single record, and I need to convert this across to HL7. For those of you not particularly familiar with HL7, I have loaded up the HL7 editor so that we can see the HL7 message in all of its glory.
The HL7 Soup editor comes with a list of sample HL7 messages that you can base your message on, and it provides you with a great place to navigate your message. It shows where you are clicking, the list of fields, and what those fields represent.
I will base my structure on message 4 of the HL7 Soup editor samples, and I will take the sample data from Excel and map those fields one at a time into an HL7 message. This could be done with HL7 receivers for a one-off process, but I really want this to be an always-running process, so I am going to take advantage of HL7 Soup's Integration Host.
HL7 Soup Integration Host and the HL7 Soup editor are both available to download from the website, and both have trials, so you are welcome to follow along and try this out for yourself.
In this scenario, I have my CSV to HL7 directories, and I am hoping to process any CSV files that get dropped in here. I already have a sample file. I have created a couple of directories as well, which are empty. The backup directory is there in case I need reprocessing. There is also an Out directory, and this is the directory that I hope to fill up with my HL7 files.
The next step is to go back into Integration Host. I start by clicking New Workflow. Straight away, it asks where I wish to receive my data from, and because I want to pick it up from the file system, I am going to select a Directory Scanner. In the name field, I will enter Get CSV.
Then I will take my directory and use that as the directory that I am scanning for files. I will change the file filter across to CSV, and I will leave it set to keep waiting for more files to be added. I do not want it to stop once it has been processed. This is going to be a forever-running process, and Integration Host does run as a Windows service.
I will change the message type I am picking up to CSV, and now it asks for a message template. This indicates what the CSV will look like, and I will use that structure to map the CSV to an HL7 message.
I am going to load my CSV in Notepad, copy out the header row of the message, and paste that into the Message Template field. It has detected all of the fields and listed them on the right-hand side for me to use in my mappings. As I do have message headers, I do not want it to process the first row. It is comma-separated, of course, and I am going to move it to a directory once I have finished processing. I will copy the file path from our backup directory.
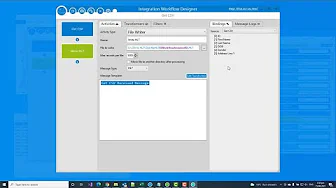
Now I have defined the CSV file, I am going to define where it will be sent to in the HL7 message. To do that, I add another step into the workflow and set where it will go. Often with HL7 messages, they are sent off as TCP. In this case, I will be writing it out as another file.
I will call this Write HL7, and I am going to put it into the output directory that I created. I will give it a file name, MYHL7.HL7. I have specified that it will write out every time with the same file name, and that would add them all into the same file.
I have given it this name so that it knows where to write it out to. If it was left as it is, it would be written into a big batch file called MYHL7, but I want to separate my CSV records into separate files. I need to change this file name for every single row in the CSV.
The easiest way to do that is to right-click in here, select Insert Variable, and then select Workflow Instance ID. The Workflow Instance ID is just a number that increments with every new row in the CSV. It would also be possible, if I had a unique value in the CSV file, to take that value and drag it into my file name.
Suppose you have another system that is going to be picking up this file immediately as this process is running. In that case, it is probably worth setting up a Move File to another directory after processing. That allows the file to be picked up only once it is finished processing. In this example, I will leave this unchecked and choose the message type as HL7.
Now I need to provide a template for it. As I said, you will probably already have an HL7 message that you can use, but if not, there are a couple of sample ones that come with Integration Host. These have some data in them. These are the empty messages, and I will choose Register the Patient.
Here you can see it placed an empty HL7 message for me with some of the key fields populated. It has our MSH line, our current date added in the appropriate format, and our Workflow Instance ID is used as the control ID. A couple of segments have some information about the patient, some information about their next of kin, and some information about a visit, which can be a great way of building up a message.
I will delete the text in the Message Template field and pretend that I have just been given one sample HL7 message that I need to populate, which is pretty standard.
As I move my mouse across an HL7 message, I get this floating window that tells me where I am in the HL7 message, and this is particularly handy for populating the data. The incoming data is pretty basic, and yours will probably be pretty basic, given that it is CSV. Let's focus on the things that I need to add.
I will alter the date of the message by double-clicking on it, right-clicking, selecting Insert Variable, and then adding the current date/time. In the Message Template field, I will find the message control ID, the incrementing number, and insert the Workflow Instance ID variable. I want to ignore the other values and leave it as 2.5.1, and I will cut the end of it to remove some noise.
The current date/time comes through in a standard machine time format, and I want this in the HL7 format, so I am going to right-click on it, choose Format Dates and Numbers, and then choose the HL7 format in seconds.
Now I want to populate the patient's information. There is no next-of-kin information or visit information in this CSV, so I will remove those and try to simplify the message a little bit.
If I take a closer look at the data brought in, there is the patient's ID, first name, last name, date of birth, gender, and address line 1. A bit more information has been provided in this message, so I will tidy this up as I go along and only put in the values I need.
I am creating a template that will be reused with the values stamped into their place. I will replace the values in the sample with the values in my CSV, and this is done simply by dragging them from the bindings list and dropping them into the appropriate part of the message.
The first name will be dragged from bindings into the Given Name field in the message template. The last name will be dragged into the Surname field. I do not have any of the other records, so I will truncate this down to make it simpler.
There is a date of birth field, so this will be dropped in, and this needs to be converted to an HL7 date format. There is no need for the time of birth in the message. Then I have the sex or gender, and this will be dragged into the message template, and the same for address line 1. All of these other records are not required for this sample.
This has now been fully populated, and generally speaking, that is all I need to do to get this up and running. I will test this now. I will hit Save and Close, and it has populated Integration Host and started straight away, but now it has come up with an error.
There is a log list of every message that has been processed by Integration Host. If this is expanded out, I can look at it and see what the error is. In this case, it could not deal with the CSV file because it was being locked by Excel. I will quickly close that to continue, clear the list, and restart the process.
This time it has processed ten messages. I can refresh my log list, and I can see it has been picking up the single lines of CSV one at a time and converting those into HL7 messages. It has populated the dates appropriately with the right format, and it has their name, date of birth, gender, and address. But looking at this, there are two problems with the data.
The first problem is that in HL7, the word Male is not valid. There are a few recognizable errors if I look at this message, so I will copy this and load it up into HL7 Soup to show you.
Firstly, Male is not the appropriate value for the gender in an HL7 message. It should be one of the values in the lookup. Another error is Cnr High & Main, because it contains an ampersand that is part of the HL7 message structure. It has divided Cnr High & Main into two different fields, and it is not valid in HL7. To rectify this, I will have to escape the ampersand and replace the word Male with the appropriate value inside HL7.
In Excel, I have a list of all the values that I would use inside my CSV file, and I have the list of associated HL7 fields that I would like to use. I will create a lookup table inside Integration Host that will automatically swap out the values from the CSV and replace them with the appropriate HL7 values.
I will copy this list and use it in Integration Host. I click on the HL7 Soup icon to bring up the menu, and I go across to Lookup Tables. I do not have any at the moment, so I am just going to add a new one and call it Gender.
It then lists the values that it goes from and the values it should be sent to. I will paste my Excel list into there, and here I can see all the values and how they should be mapped. There is one more that I want to deal with, and this is when I do not have a value. I will put that in as U because I want this to be the unknown value.
Now I can go back to our designer to look at the message. I double-click it, reload that window, head down to where it places it into the HL7 message, navigate down to Gender, right-click it, and select Truncate and Replace. Then I choose Lookup Tables, and inside here I see my new Gender lookup table. By clicking that, I have now told it to use that lookup table to replace the values.
I also wanted to escape the values in Address Line 1. To do that, all I have to do is right-click Address, go to Encoding, and select which type of HL7 encoding I want. Now, if the address is missing, it will put in a double quote, and it is also going to escape out that ampersand value with the appropriate HL7 escape characters. I will then save and close.
Now I will delete the files I created last time for testing in the Out directory. I will then go up a directory to the Backup directory, copy the file, go back, and paste this in again. It will be an always-running process.
I will refresh the list, and the messages have been processed. If I look this time, I will see that Gender has been replaced with Female. On the other message, I can see that Male has been replaced with M, and I can see now that the address Cnr High & Main has become Cnr High\T\Main, which is the escape character for the ampersand in an HL7 message.
Now I have valid HL7 coming out whenever I drop a CSV file into my directory.
There are some great getting started videos to get you up and running with Integration Host and HL7 Soup available on the HL7 Soup website under tutorials.
If you found this video helpful, please consider giving us a like or even subscribing to our channel. If you have any questions about getting going with HL7, please drop us a line at the HL7 Soup support site.