
Introduction to the HL7 Soup Editor
What this tutorial covers
In this tutorial, we'll show you why HL7 Soup is the world's favorite HL7 tooling. It is simple to use, yet powerful in function. We'll show you the basics, show some clever tricks, and point you in the direction to go further.
HL7 Soup is made of two products:
- HL7 Soup Editor: a tool for visualizing and editing HL7 messages, either individually or in bulk.
- Integration Host: a secure way to connect medical systems together, transform and convert between message types, and run workflows continuously or on a schedule.
In this tutorial, we'll be focusing on the HL7 Soup Editor, but the products are tightly linked, so you'll see Integration Host pop up here and there too.
Before you start
- Install HL7 Soup so the sample HL7 messages are available in the editor.
- Use the sample messages first if you are new to HL7, then replace them with your own samples when you are ready.
- For the send-and-receive example, keep a local test port available. The tutorial uses TCP port
22222. - Install Integration Host as well if you want to promote a receiver into an always-running integration.
The main editor view
Let's load the HL7 Soup Editor and take a look.
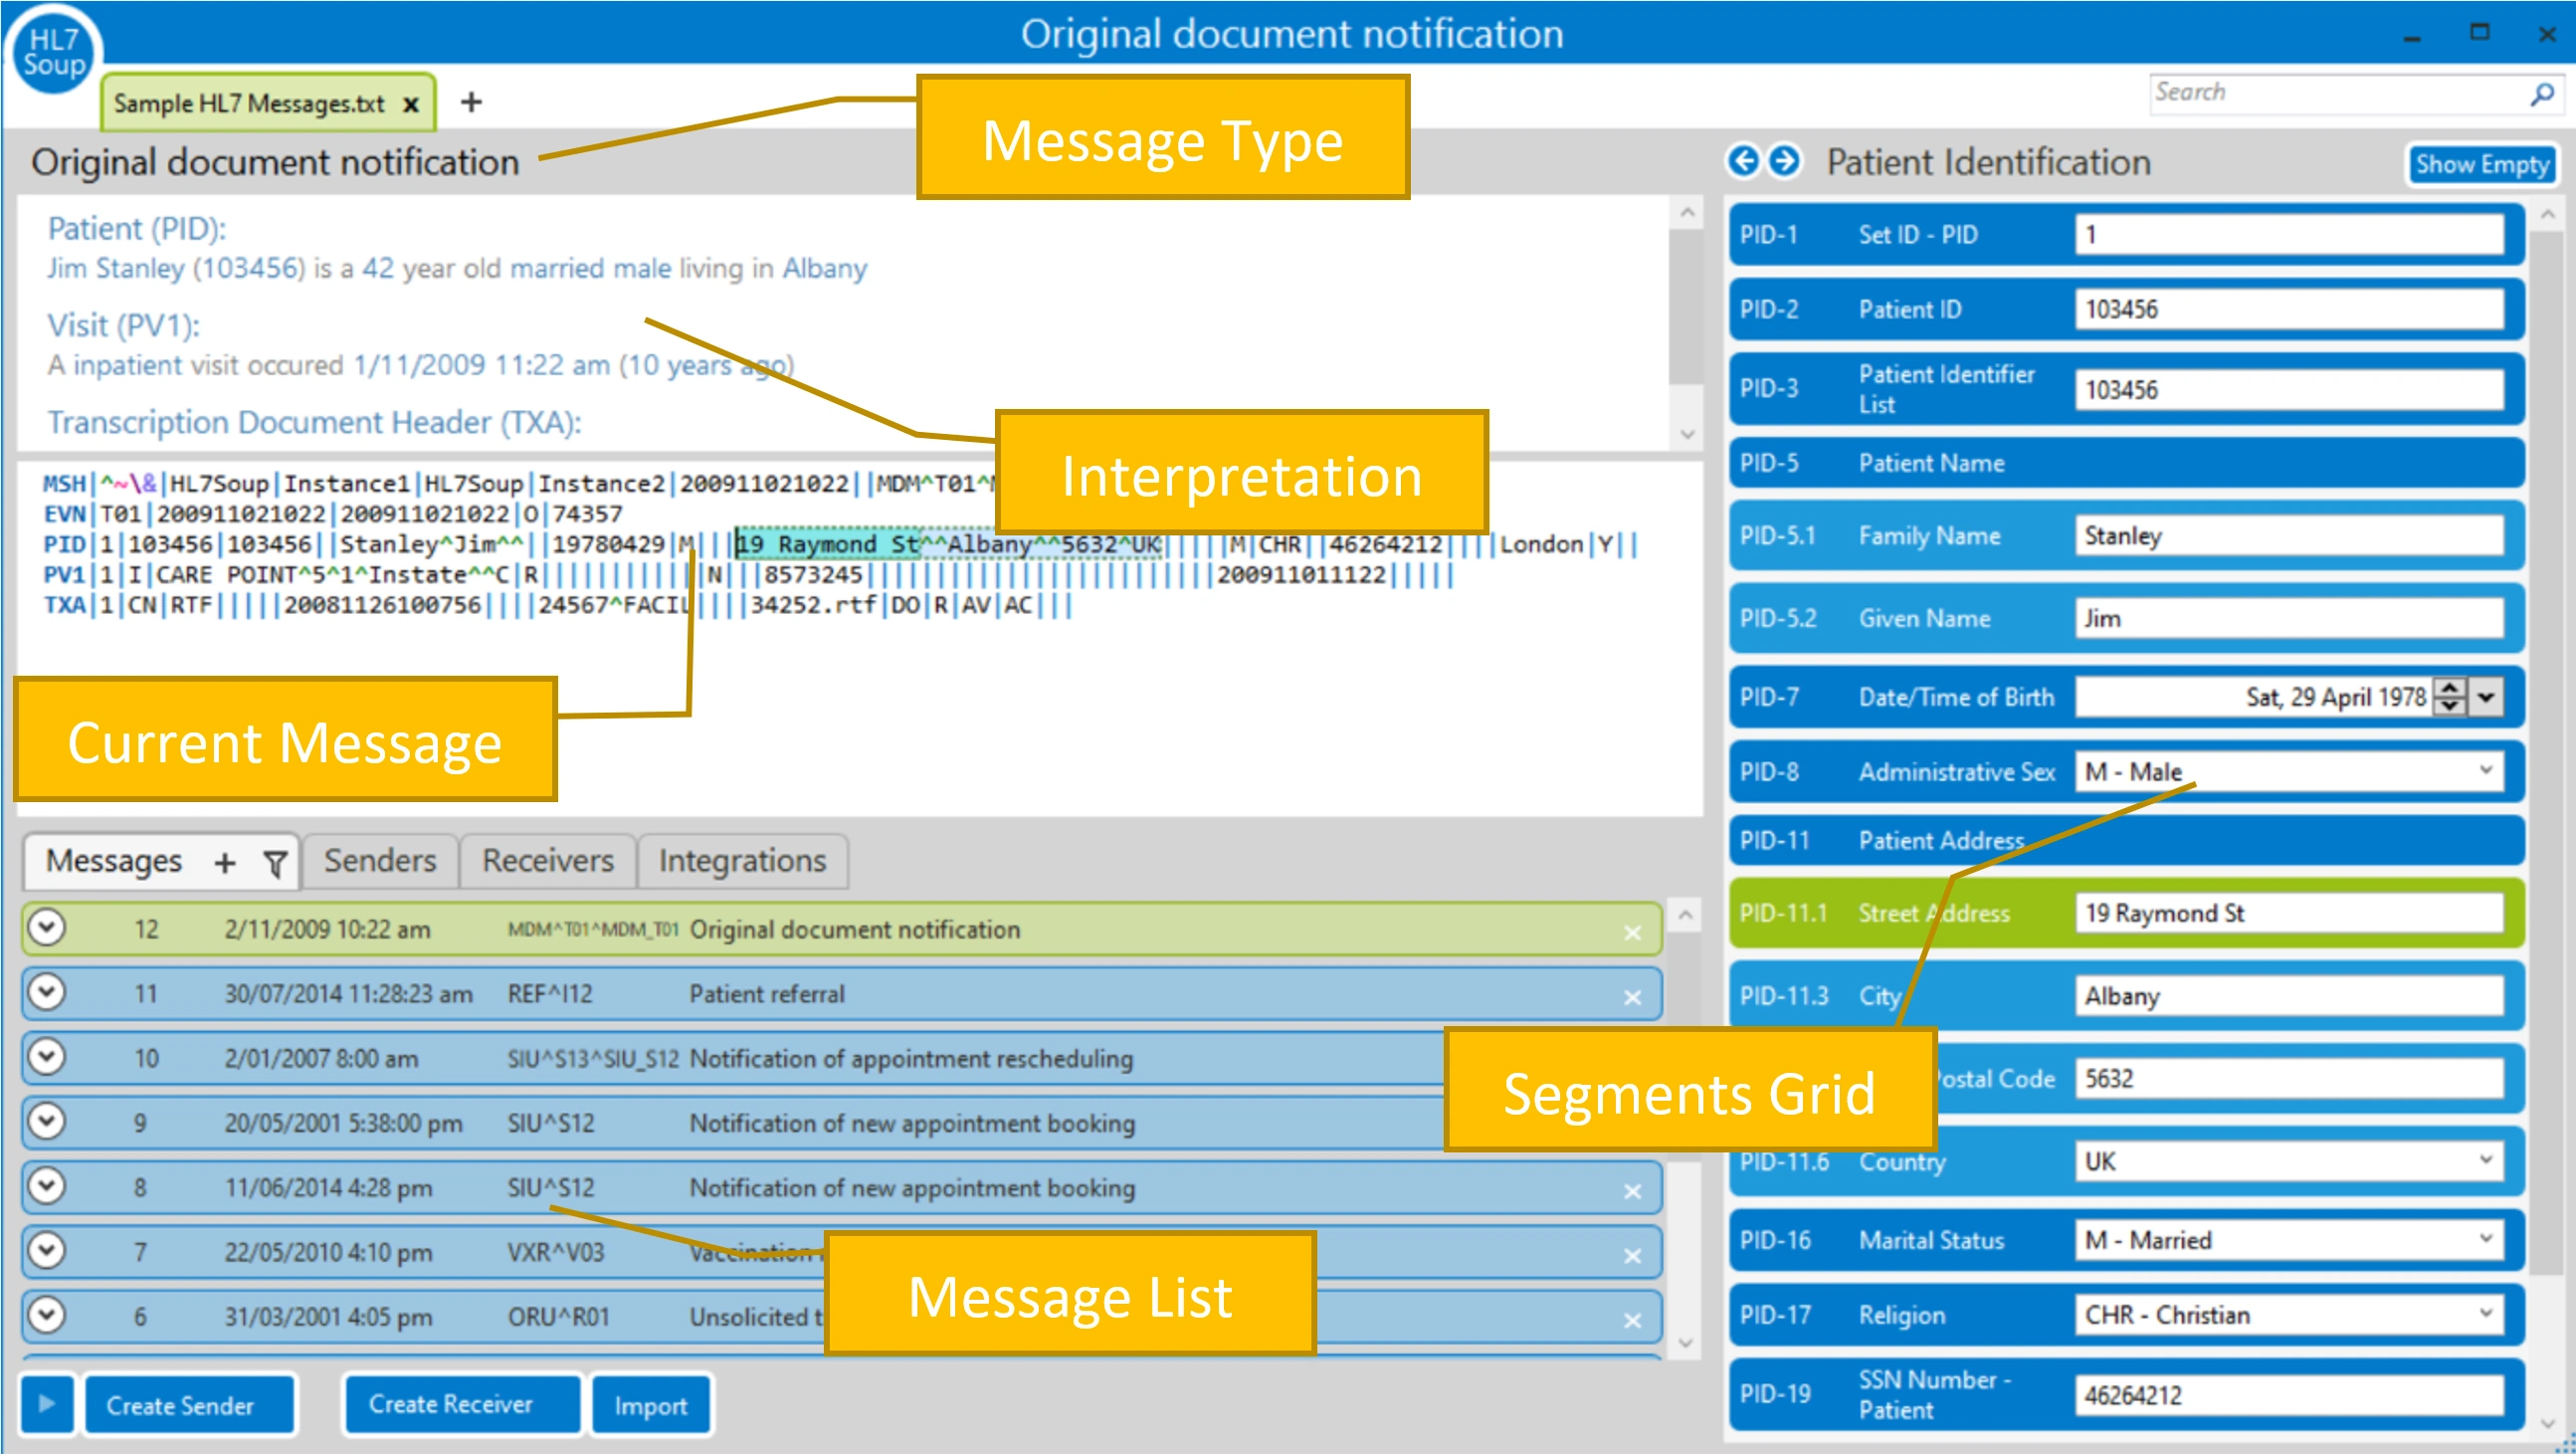
What do we see here? Well, at the center of things is an editable HL7 message. This is the current message we are focused on, and everything around us is there to help work with it.
The message type is shown at the top, and directly below that is a human-readable interpretation of the message. The Segment Grid looks at the details of the currently selected line.
These are all linked together so that clicking or changing the values navigates and updates between the three views.
Work with the Messages list
Lower down are tabs that provide additional features. We'll cover them all, but right now let's consider the Messages list. HL7 Soup provides 12 sample messages that you can play with. Clicking on a message loads it into the editor. You can edit and save the sample messages, and your changes will be remembered.
Replacing them with your own samples is easy, and can help you be more productive. You can always revert to the defaults by deleting the sample file.
The Messages list can come from one HL7 file with lots of messages in it, or you can drag in many files at the same time and build a list that way. Add to the list by clicking the plus button to create a new message, or click the paste button to paste in one or more messages from your clipboard.
Zoom, highlight, and validate
Zooming: Holding down Ctrl while spinning the mouse wheel allows you to make the font of the message bigger or smaller, so things are easier to see.
Highlighting and validation: Better still, why not highlight fields you commonly use in a different color for easier identification? As you jump between messages, it is always easy to find what you are after.
You can even set invalid criteria that instantly notifies you of problems. After adding validation to highlight a value red, take a look at the Messages list. All the invalid messages are highlighted red too. You can add a filter to show just the invalid messages, and when you view those messages, the error is instantly highlighted.
We've got a whole video that goes through highlighting, comparing, and validating HL7 messages.
Send and receive HL7 messages
Sending and receiving HL7 messages is a common requirement. HL7 Soup makes it easy to create senders and receivers for different systems. Senders take the HL7 messages from the Messages list and send them on.
- Create a new sender. Open the Senders tab, click New, and configure it to send via TCP on the local IP address using port
22222. - Adjust the sender settings if needed. You can change how the message is sent, which messages are used as the source, and the speed of sending. For the first test, the defaults are fine.
- Create a matching receiver. Open the Receivers tab, click New, and set the receiver to TCP on port
22222. - Keep incoming messages visible. The receiver is set to add incoming messages to the current Messages list, which is helpful while testing.
- Use a second tab for the receive side. Rather than sending the messages back to the same list, add another tab and send to that instead.
- Start the receiver and send a test message. Start the receiver, return to the first tab, and click Send. A success acknowledgement confirms the local connection is good.
- Send the full list. Once the connection is confirmed, click Play to send all the messages through, then review the received messages in the other tab.
The start and stop controls for senders and receivers are available down the bottom of the editor, no matter which tab you are on.
Receivers can also be configured to manipulate the incoming message with powerful workflow tooling. You can manipulate the data, filter messages, write to a file, send it on with HTTPS, REST, or web services, or convert between message types such as CSV, XML, and JSON.
Use Integration Host from the editor
Back in HL7 Soup, take a look at the Integrations tab. Here you have a view into Integration Host. You can see the status of each integration, start them, stop them, create them, and edit them. Take a look at the Integration Host Getting Started tutorials for more details about how to create integrations.
The editor's view of Integration Host is very similar to the Integration Host Client's. However, clicking in the logs of your integration will load them straight into the HL7 Soup Editor, with all your highlighters and validation at hand.
Many people ask: if you can create a receiver that transforms HL7 with the editor, can you make that an always-running workflow with Integration Host? You certainly can. You can promote any receiver to be an integration with a simple click. It will keep running even if you close HL7 Soup, and the logs can be used to review messages or load them back into the editor's Messages list.
Useful checks while exploring
- Raw HL7 is hard to read: use the interpretation panel and Segment Grid to understand the selected segment and field.
- Important values are easy to miss: add highlighters for fields you use often.
- Validation errors are scattered across the list: filter the Messages list to show invalid messages only.
- The sender succeeds but nothing appears: confirm the receiver is started and listening on the same host and port.
- A receiver needs to run all the time: promote it to Integration Host instead of leaving it dependent on the editor being open.
Related tutorials
- Validate, highlight, and compare HL7 messages
- Integration Host Getting Started Part One
- Return to the HL7 tutorial directory
Download 30 Day Free Trial of HL7 Soup
Video Transcript
Read the full transcript
Welcome to the Introduction to HL7 Soup. In this tutorial we'll show you why HL7 Soup is the world's favorite HL7 tooling. It is simple to use, yet powerful in function. We'll show you the basics, show you some clever tricks, and point you in the right direction to go further.
HL7 Soup is made of two products. HL7 Soup Editor is a tool for visualizing and editing HL7 messages, either individually or in bulk. Integration Host securely connects medical systems together, transforming and converting between message types, always running or scheduled to suit.
In this video we'll be focusing on the HL7 Soup Editor, but the products are tightly linked, so you'll see Integration Host pop up here and there too. Let's load the HL7 Soup Editor and take a look.
What do we see here? Well, at the center of things is an editable HL7 message. This is the current message we are focused on, and everything around us is here to help work with it. This is the message type. Here is a human-readable interpretation of the message, and here is the Segment Grid, looking at the details of the currently selected line.
These are all linked together so that clicking or changing the values navigates and updates between the three views.
Here we have some tabs that provide additional features. We'll cover them all, but right now we see the Messages list. HL7 Soup provides 12 sample messages that you can play with. Clicking on a message loads it into the editor. You can then edit and save the sample messages, and your changes will be remembered.
Replacing them with your own samples is easy, and it can help you be more productive. But you can always revert to the defaults by deleting the sample file. The Messages list can come from one HL7 file with lots of messages in it, or you can drag in many files at the same time and build a list that way.
Add to the list by clicking the plus button and creating a new message, or click the paste button to paste in one or more messages from your clipboard.
Let's zoom back to the editor section now and make it bigger. Holding down Control while spinning the mouse wheel allows me to make the font of the message bigger or smaller so things are easier to see.
Better still, why not highlight fields I commonly use in a different color for easier identification? Now, as I jump between messages, it's always easy to find what I'm after. I can even create a validation that notifies you of invalid values.
I can add a filter to show just the invalid messages, and when I view those messages the error is instantly highlighted.
We've got a whole video that goes through highlighting, comparing, and validating messages. This is just a taste, but I'll link to that video here and at the end of this tutorial too.
Sending and receiving HL7 messages is a common requirement. HL7 Soup makes it easy to create senders and receivers for different systems. Senders take the HL7 messages from the Messages list and send them on.
I'll create a new sender, and we'll configure it to send via TCP on the local IP address, port 22222. I can easily adjust how it's sent, the source of the message, and the speed of sending. I'll use the default settings, save, and head over and create a receiver.
Click New, and we can configure the receiver. We'll set it to match the sender: TCP on port 22222. It shows us the address to use if we call it from another computer, and also note that it's set to add the incoming message to the current Messages list. Again, I'll save it, and we'll head back to the editor.
Down the bottom here we have the ability to start and stop our senders and receivers no matter which of these tabs we're on, and clicking on Messages shows me what's available for sending.
Rather than sending the messages back to the same list, I'll add another tab and send it to that instead. I'll start the receiver here, then head to my first tab and hit Send. Great, an auto-generated success acknowledgement.
Since I've confirmed my connection is good, I'll hit Play and have all the messages sent through. Now I can head over to the other tab, and here they are.
Receivers can also be configured to manipulate the incoming message with powerful workflow tooling. You can manipulate the data, filter messages, write to a file, send it on with HTTPS, REST, web services, or convert between message types: CSV, XML, and JSON.
So many features are possible that it's not possible to cover them in this video. But take a look at the HL7 Soup website, and you'll find the tutorials and libraries that take you through the steps required. We keep adding more videos too, so remember to check back.
Back in HL7 Soup, we'll take a look at the Integrations tab. Here we have a view into Integration Host. We can see the status of each of the integrations, start them, stop them, create them, and edit them. Take a look at the Integration Host Getting Started tutorials for more details about how to create integrations.
The editor's view of Integration Host is very similar to that of the Integration Host Client. However, clicking on the logs of your integration will load them straight into the HL7 Soup Editor, with all your highlighters and validators at hand.
Many also ask: if they can create a receiver that transforms HL7 with the editor, can they make it an always-running workflow with Integration Host? You certainly can. You can promote any receiver to be an integration with a simple click.
Look, this is now running as an integration inside Integration Host. It will keep running even if I close HL7 Soup. It also means that when I send messages, they will go there instead. I can now use the logs to review my messages, or even load all the logs back into the editor's Messages list.
As promised, here's the link to the highlighting and validation tutorial and the getting started tutorial for Integration Host. We'll have more videos coming out, so why not subscribe to us on YouTube? And if these tutorials have helped you, consider giving us a like to return the favor.
We worked hard to make HL7 Soup tools fantastic to use. I'm sure you'll love them.