
Securing HL7 messages with HTTPS over SSL/TLS
What this tutorial configures
This tutorial shows how to protect HL7 messages that are sent over HTTP by using HTTPS with TLS. The receiving computer gets a certificate, HL7 Soup uses that certificate on an HTTP Receiver, and the sender calls the endpoint with an https:// address instead of plain http://.
The original video uses the word SSL because that is still the common shorthand people use when talking about certificates. The important point is that SSL itself is deprecated. The workflow is about using TLS to encrypt the connection so sensitive HL7 data is not readable while it moves between computers.
Before you start
- HL7 Soup installed on the receiving computer.
- An unused port for the HTTP Receiver.
- A certificate for the receiving computer. This can be a purchased certificate or a self-signed certificate for a trusted integration partner.
- Permission to import certificates into the Local Machine certificate store and bind a certificate to a port.
- Firewall access for the selected receiver port when another computer needs to connect.
Certificate trust in plain English
When data such as HL7 is sent between computers, it does not always travel directly from sender to receiver. It can pass through other networks, especially when it goes out over the internet. TLS encrypts the message so only the sender and receiver can make sense of it.
A certificate authority certificate is trusted broadly because the issuing vendor is already trusted by Windows and browsers. A self-signed certificate is different: nobody trusts it automatically. For private healthcare integrations, that can still be useful because the sender and receiver already know each other and can choose to trust that certificate directly.
For production systems, use your organization's certificate policy and security requirements. TLS protects the transport between two computers, but it is only one part of a secure healthcare interface.
Step-by-step guide
- Create or obtain the certificate. Use a certificate authority certificate when you need ordinary Windows and browser trust. For a private integration where both sides agree to trust the endpoint, you can create a self-signed certificate.
-
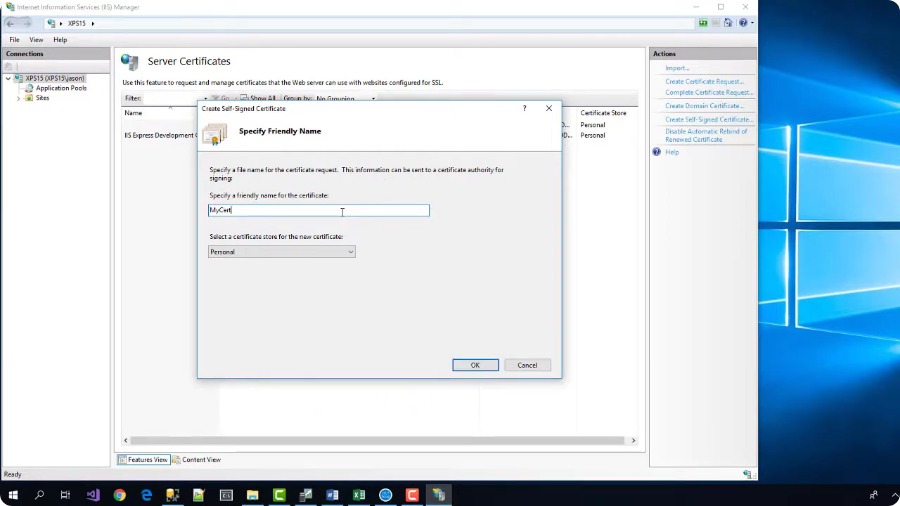
Create a self-signed certificate in IIS Manager when testing. Open IIS Manager on the receiving computer, double-click Server Certificates, choose Create Self Signed Certificate, give it a friendly name, select Personal, and click OK.
Create a self-signed certificate in IIS Manager when both systems can agree to trust it. -
Confirm the certificate is in the Windows certificate manager. Open the computer certificate manager and expand
Personal, thenCertificates. The certificate should appear with the friendly name you entered.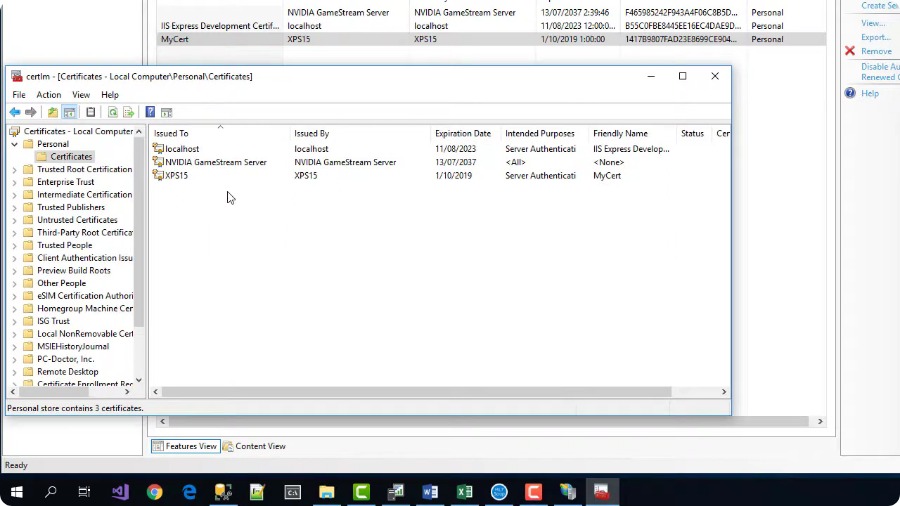
Imported or created certificates should be available in the Local Machine Personal certificate store. - Import a PFX certificate if you were given one. If you purchased or received a PFX certificate, double-click it, import it into Local Machine, enter the password, and place it in the Personal certificate store.
- Create a new HL7 Soup receiver workflow. In HL7 Soup, create a receiver workflow, change it to an HTTP Receiver, name it clearly, and choose an unused port.
-
Enable SSL/TLS on the HTTP Receiver. Select the SSL/TLS option in the receiver settings. Register the address if HL7 Soup needs access to the port without running as administrator.
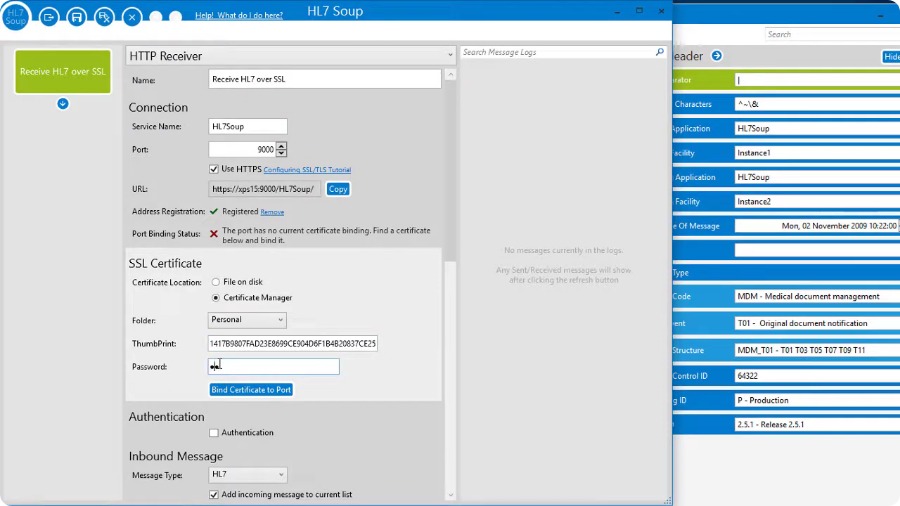
Enable SSL/TLS on the HTTP Receiver and point HL7 Soup at the certificate. - Choose the certificate source. HL7 Soup can use a certificate file directly or find a certificate from the Windows certificate store. The tutorial shows the certificate store approach.
- Copy the certificate thumbprint. In certificate manager, double-click the certificate, open the Details tab, locate the thumbprint, copy it, and paste it into HL7 Soup.
- Enter the certificate password when needed. If the certificate was exported with a password, enter it in HL7 Soup. If it does not have a password, leave the field blank.
- Bind the certificate to the port. Complete the binding step so Windows and HL7 Soup know which certificate belongs to the HTTPS receiver endpoint.
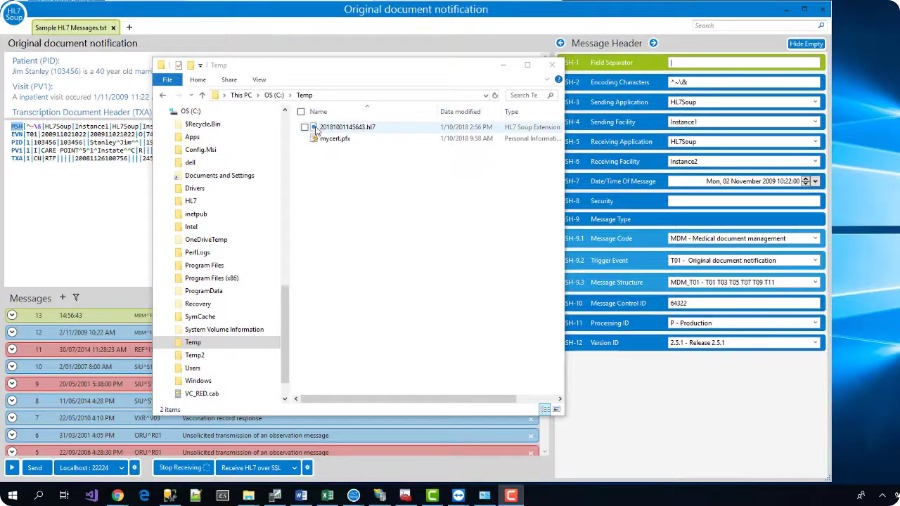
- Finish and start the workflow. The tutorial writes the received HL7 message to disk so there is a visible result. Save the workflow and start it running.
- Test the HTTPS address locally. Paste the HTTPS URL into a browser. An HL7 error response is still a useful first sign because it proves the secure endpoint answered, even though the browser did not send an HL7 message.
-
Test from another computer. If the page times out, check the firewall. If the browser warns about the certificate, that is expected for a self-signed certificate. A certificate authority certificate should avoid that warning.
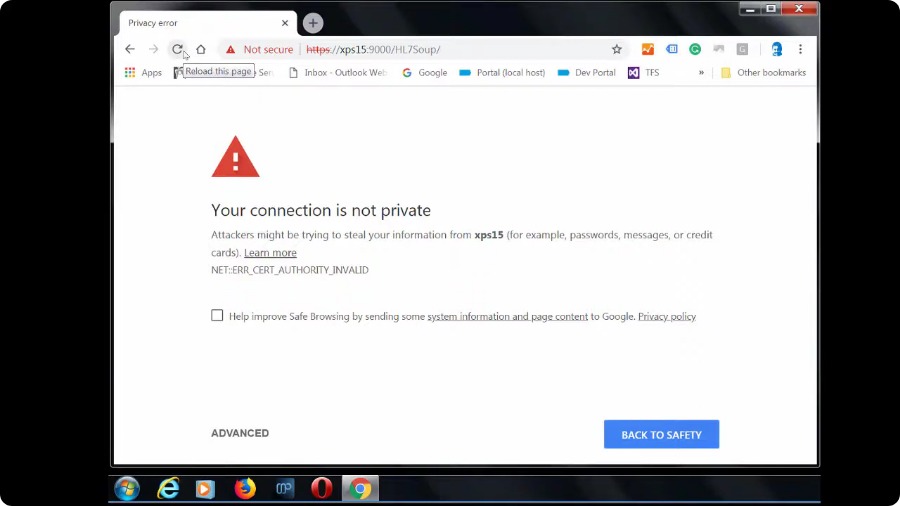
A browser warning is normal with a self-signed certificate unless the browser has been configured to trust it. -
Send a real HL7 message. Create an HL7 Soup sender, point it at the HTTPS address, send a message, and confirm the receiver writes the message to disk.
Send a real HL7 message to the HTTPS endpoint and confirm the receiver writes the message to disk.
Self-signed certificates and browser warnings
A browser warning does not automatically mean the HL7 integration is wrong. Browsers do not trust a homemade certificate by default. In a controlled HL7 integration, the sending system can be configured to trust the receiver certificate because the trading partners already know the endpoint they are calling.
That said, a certificate authority certificate is usually cleaner for endpoints that need broad trust, easier troubleshooting, or browser-based testing without warnings.
Useful checks and troubleshooting
- The HTTPS URL times out: confirm the HL7 Soup workflow is started and the selected port is allowed through the Windows firewall or network firewall.
- The browser shows a certificate warning: self-signed certificates are not trusted automatically. Use a certificate authority certificate or explicitly trust the self-signed certificate where appropriate.
- HL7 Soup cannot bind the certificate: confirm the certificate is in the expected store, the thumbprint was copied correctly, and the password is correct when one was set during export.
- The browser returns an HL7 error response: that can still be a successful connection test. A browser request is not an HL7 message, so the receiver may answer with an HL7 error.
- The sender cannot connect from another machine: test from the receiver computer first, then test from the sender network, checking DNS, port, firewall, and certificate trust in that order.
Related tutorials
- HTTPS certificates and port binding
- Configure SSL/TLS for Integration Host on AWS
- Receive HL7 and FHIR on an Azure VM
- Return to the HL7 tutorial directory
Download 30 Day Free Trial of HL7 Soup
Video Transcript
Read the full transcript
Hello and welcome to this tutorial on securing HL7 messages with SSL. Before we start, I just need to clarify one thing. SSL is a deprecated format that has been replaced by TLS.
However, the term SSL is still in common use when referring to Transport Layer Security, and so I have used this term throughout the video. Be assured that HL7 Soup uses TLS 1.2 only and will never utilize the now vulnerable SSL protocol.
So why do we need to use SSL, or its replacement TLS?
When data such as HL7 is sent between computers it does not always go direct. It gets bounced around a bit, particularly when it goes out onto the internet. Because you are sending sensitive medical data, you do not want this to fall into the wrong hands.
SSL/TLS fixes this problem by encrypting the message so that only the sender and receiver can access it. To an observer in between, it looks like garbage. It is all done with clever mathematics and very large numbers that store a secret key in a file called a certificate.
The receiving computer needs to be configured with the certificate, and the address needs to be changed from HTTP to HTTPS. Once that is done, your data is protected.
So how do you get a certificate file? You have two options. You can create your own. It is pretty easy to do so, and I will show you a simple way later in this video. Alternatively, you can buy one.
Why would you buy one when you can make your own easily for free? It is all about trust. When you buy a certificate, the vendor checks to make sure that you are you. The vendors are already trusted by Microsoft, so when they state they trust you, all Windows computers will trust you too. This means your certificate will work everywhere.
However, when you make your own certificate, nobody trusts it, so it just does not work. Fortunately, when creating a software integration between systems, both sides have already partnered up and are happy to trust each other anyway. This means that the sender can just state they trust your homemade certificate, and you are back in business.
For this reason, I will be demonstrating how to create a homemade certificate first.
You can create a certificate in a command prompt with the MakeCert command. Follow this link if you would like to know more, but let me show you the easy way.
Start by loading IIS Manager on your receiving computer. If you do not have it, just do a quick Google for how to enable IIS Manager for your version of Windows. It is part of Windows, so do not worry, you are not installing stuff from the web.
Now double-click Server Certificates. Then, up in the right-hand options, click Create Self Signed Certificate. Give your certificate a friendly name, select Personal, and then click OK. Your certificate has been created.
It is shown here in IIS, but also in your computer certificate manager. Just expand Personal, then Certificates, and there it is with the friendly name you typed.
If you had purchased a certificate from a certificate authority, they would have given you a PFX file. Let me export my created one as an example. Right-click, choose All Tasks, then Export. I will include the private key, take the defaults, and give it a password.
Now I just need to put it somewhere. That is it. I can delete this one now.
Now that I have a PFX file, I can double-click to import it. Select Local Machine, put in the password, and allow it to import into the Personal folder. It is done. Now when I refresh, my certificate is available again.
As you can see, it is pretty easy to get a certificate installed, regardless of whether it was created by yourself or by a certificate authority.
Now that we have a certificate installed, let's use it in HL7 Soup and create a new HTTP Receiver.
Start by loading HL7 Soup and creating a new receiver workflow. I am going to change this to an HTTP Receiver and call it Receive HL7 over SSL.
Now I just need to give it an unused port number and select that I am using SSL/TLS. I will also quickly register this address so HL7 Soup has access to this port without needing to be run as an administrator.
Now to the SSL/TLS settings themselves. Firstly, I need to locate my certificate, and that can be done by either pointing at the file or by locating it in the certificate manager.
The file option is pretty self-explanatory, so I am going to show you how to use the certificate stored in the manager. We stored the certificate in the Personal store, so the default folder is correct, but now we need to find the thumbprint.
Back in certificate manager, we just double-click our certificate, go to the Details tab, and locate the thumbprint. I will copy this to my clipboard, head back to HL7 Soup, and paste it in.
Now I just need my password. When I exported the certificate earlier, I added a password to it, so now I have to enter it. If I had not added the password, then I would have left this blank.
Now all that remains is to bind the certificate to the port. That is it, SSL/TLS is configured.
I can now copy this HTTPS address and pass it on to the sender. Before I do though, let me quickly complete the workflow. I am simply going to make it write out the received HL7 message to disk.
Great, so let's save this workflow and start it running.
We can now test this out by pasting the URL into my browser and hitting Enter. Great, an HL7 response. We did not actually send it an HL7 message, hence the error message, but it shows we did connect.
So what happens now if I head over to another computer and attempt to browse this address?
The first thing is it will probably time out and tell you that the site cannot be reached because you forgot to allow HL7 Soup through the firewall. I will configure this properly later, but for testing purposes I am going to turn off my firewall.
Now when I refresh, I get this nasty-looking warning. That is because I have a self-signed certificate. If I used a certificate I got from a certificate authority, everything would be working now.
That is OK. I am just going to expand the advanced options and click to proceed.
I can now see the expected response. If you want your browser to fully trust a self-signed certificate, then I suggest that you Google it as there are too many browsers out there to show on this video, and it does not actually matter. We do not actually care if the browsers do not trust the certificate because they are not the sending app.
With medical integrations, the sender did not randomly find the receiver's address on the internet. They were given it directly from the receiver. Because of this, integration engines do not tend to mind that the certificate is self-signed and will allow it to be called.
So let's try it out.
We could send from an activity within another workflow, but for testing purposes we will create a sender in HL7 Soup and point it at our address. That is all I need, so I will save it and try sending through a message.
That looks a correct response to me. And if I check, we will see that a file has been created on the receiver containing the HL7 message I just sent.
So that is it. SSL/TLS configured and working.
It is now time for a quick disclaimer. All we have now is a secure connection between the two computers. Just because you have done this does not mean that your data is 100 percent secure from hackers. We recommend using a security expert to help.
Also, it is worth noting that some certificate authorities give away free certificates these days. Check the reviews first, but they can be a great way to simplify your configuration.
If we have helped you, then please give our video a like and consider subscribing to this channel for more tutorials.