
Receive HL7 and FHIR on an Azure VM
What this tutorial builds
This tutorial sets up HL7 Soup's Integration Host on a Windows Azure virtual machine so external systems can send healthcare messages to it over HTTPS. The same receiver pattern can accept HL7, FHIR, XML, JSON, CSV, or other message formats supported by your workflow.
The example receives HL7 messages on port 8080, restricts access to the sender's IP address, tests the endpoint from the HL7 Soup editor, and then writes each received message to a unique file on the VM.
Before you start
- A running Windows Azure VM that you can access with RDP.
- HL7 Soup's Integration Host installed on the VM. The free trial is enough for following the tutorial.
- HL7 Soup installed on the sending computer so you can create an HTTP Sender and send test HL7 messages.
- Permission to edit the Azure VM networking rules and the Windows Firewall rules on the VM.
- The public IP address or source CIDR range that should be allowed to send to the VM.
- A destination folder on the VM, such as
C:\temp, where test message files can be written.
Step-by-step guide
- Create the receiver workflow on the VM. RDP into the Azure VM, open Integration Host, click New, and choose an HTTP Receiver activity.
- Name the service and set the port. Give the receiver a clear service name, set it to receive on port
8080, and enable HTTPS. Copy the generated service address so you can reuse the path when creating the sender. - Save the receiver. Saving the workflow configures Integration Host to listen internally on port
8080. The endpoint still needs to be exposed through Azure and Windows Firewall before an external machine can reach it. - Add an Azure inbound port rule. In the Azure portal, open the VM's Networking page and add an inbound port rule. Set Source to IP Addresses and enter the sender's public IP address or approved CIDR range.
- Point the rule at the VM network card. Leave the source port range as
*, use the VM's private network-card IP address as the destination, choose Custom, and allow TCP port8080. - Open the Windows Firewall port. On the VM, open Windows Defender Firewall with Advanced Security, create a new inbound Port rule, choose TCP port
8080, allow the connection, select the profile that applies to the VM, and name the rule something obvious such asHL7 Soup HTTPS. - Create the sender in HL7 Soup. On the sending computer, open HL7 Soup, go to Senders, click New, and choose an HTTP Sender. Paste the Integration Host address you copied from the receiver.
- Use the Azure public IP address. Replace the internal VM host in the URL with the VM's Azure public IP address. Keep
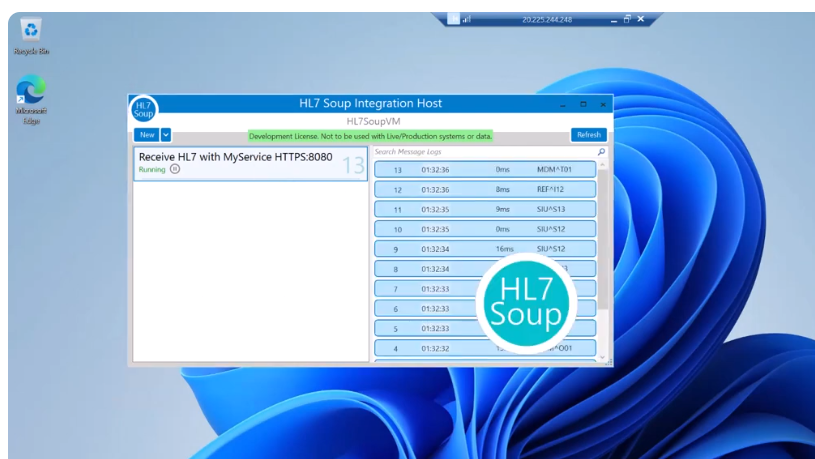
:8080in the URL, because that is the port exposed by the Azure rule and Windows Firewall rule. - Test and send messages. Click Test in the HL7 Soup sender. When the test succeeds, save the sender and send one or more sample HL7 messages. The Integration Host workflow on the VM should show the incoming messages.
- Write messages to disk. Edit the Integration Host workflow and add a file-writing activity. Use a test folder such as
C:\tempand a file name such asmyfile-<workflow-instance-id>.hl7so each received message writes to a unique file. - Retest the full workflow. Send the messages again from HL7 Soup, then open the destination folder on the VM and confirm that a separate HL7 file appears for each received message.
8080.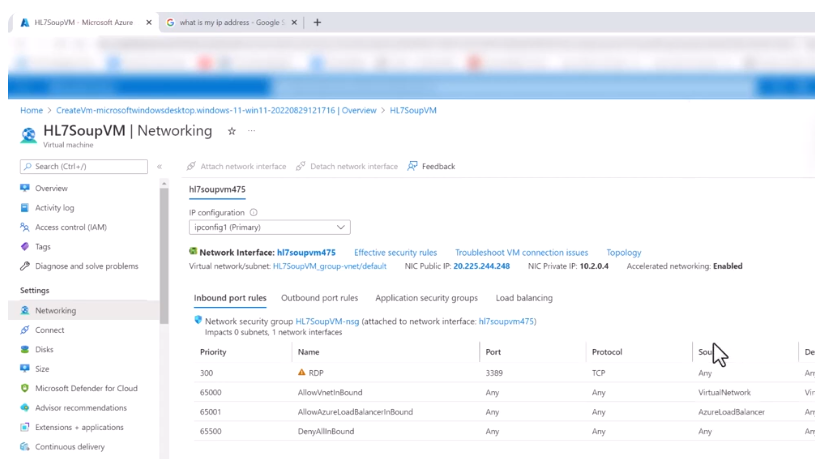
Security and deployment notes
Use the tightest source range you can. The tutorial looks up the current public IP address of the sending computer and uses that as the source. For production, use approved partner ranges, VPN ranges, or another controlled ingress pattern instead of opening the listener to the whole internet.
Keep the endpoint on HTTPS, confirm certificates are handled correctly for your environment, and review whether client certificates, VPN access, private networking, or additional authentication are required before receiving real patient data.
Useful checks and troubleshooting
- The HL7 Soup sender test fails: check that the URL uses the Azure public IP address, preserves
:8080, and still includes the Integration Host service path. - Azure allows the port but no message arrives: confirm the inbound port rule uses the correct source IP range, destination private IP address, protocol, and destination port.
- The Azure rule looks right but the VM still blocks traffic: check the Windows Defender Firewall inbound rule for TCP port
8080and the active network profile. - The sender works once and then stops after your IP changes: update the Azure inbound rule with the new public IP address or use a stable approved range.
- Files overwrite each other: include the workflow instance ID, timestamp, or another unique message value in the file name.
- You want FHIR, JSON, XML, or CSV instead of HL7: keep the same HTTPS listener pattern and adjust the workflow's message type and downstream activities for the payload you receive.
Related tutorials
- Process HL7 and FHIR in the cloud
- Process HL7 with Azure App Services
- Process HL7 using Azure Docker Container Instances
- Configure Azure Vault for global variables
- HTTPS certificates and port binding
- Return to the tutorial directory
Download 30 Day Free Trial of HL7 Soup
Video Transcript
Read the full transcript
Hello and welcome to this tutorial on sending HL7 messages to an Azure VM. You'll be able to create other message types as well, such as FHIR or JSON, whichever you like. We're going to set it up so that we can receive whatever message type you need on an HTTPS connection.
You'll see here I've already got a VM configured. It's up and running, and I have an RDP connection to it. Inside the VM, I've already gone ahead and installed HL7 Soup's Integration Host application, and I downloaded the free trial as well, so it's ready for use.
First we've got to create an HTTP listener. I'm going to start by clicking New, then change the activity type to an HTTP Receiver. We give it a nice service name, and we're configured to receive on port 8080. I'm going to select to use HTTPS, and then copy the address to use later on.
You can now hit Save, and we've internally configured it to receive messages on 8080. We need to expose that address to the internet, so I'm going to head back to the Azure configuration and allow that through.
We head over to the Networking category, and we just have to add a new inbound port rule. Click Add port rule. I'll set my source to IP addresses, and then we set it to the IP address ranges coming in. I only want this to be able to send from my computer, so I'm going to load up Google and search for "what is my IP address." There's my IP address. I can copy that, head over to the rules, and paste that in as my incoming address.
The source port ranges I will leave as star, and finally we need to send it to an IP address. I'm going to use the internal IP address on the network card. Service is Custom, and the destination port is already set to 8080, so I think we're prepared to add that in.
Great. That's going to create the security rule. That can take a couple of minutes to do, but mostly it happens pretty quickly. Now let's head back to the server, and we need to allow it through the firewall.
I'm just going to click Start, search for Firewall, go to Advanced Settings, and now we just add a new inbound rule. New Rule, and we're going to allow it through on the port. Next, we're going to type in port 8080, Next, Allow the connection, Next, and we'll just allow it through on the public one. We're going to call this HL7 Soup HTTPS, and that is now ready to receive.
Let's try that out. I'll head back to my computer, and in order to test it I'm going to use HL7 Soup, the editor. For that, we've got a selection of HL7 messages ready to send, so let's send that to the server.
Back to the server again, all I want to do is quickly grab that address. I copied it earlier. I forgot I did. We've already got that address here, so I can just copy that address. Again, that's the internal address. We don't need to save. I just need to go back, and we can create a new receiver inside of... sorry, a new sender inside of HL7 Soup.
Go to Senders, click New, and I will change it to an HTTP Sender. I'm going to paste in the URL. Now we just need to provide the IP address of the server. Back over to Azure, and here is that public IP address. Copy that and paste that in. Oh, I'm going to get that right. You need to keep the port 8080 as part of the port.
Now if I hit Test, we get the success. I can now save and close, bring back our HL7 Soup, look at the messages, and send that through. We've got an acknowledgment of the successful send, and indeed we have received it. I can head back and send the rest of the messages.
Now what happens to the message once we've received it? We want to save it to the disk, so I'm going to alter this workflow, add another step, and we're going to write it out to a file. In this case, I just need to put it into a directory. C:\temp will work for now, and I'm going to call it my file dot HL7.
Then, just to make sure that the file is unique, I'm going to insert a variable of the workflow instance ID. That will make sure that each file name has a unique ID attached to it. Now I can save and close this, and if I run those messages through again, head back to the VM, and open the file system, we will see those appearing.
Files received on the server. If this tutorial has helped you, please like, subscribe to the channel, and feel free to contact HL7 Soup support if you need any help.