Mastering the Integration Host Workflow Designer
What this tutorial explains
This tutorial is the deep orientation for the Integration Host Workflow Designer. It is not really a recipe for one finished interface. Instead, it explains how the designer is organized, what each part of the screen means, and how the pieces work together when an HL7 workflow receives, maps, sends, filters, and logs messages.
Use this guide when you already know the basic idea of Integration Host, but the designer still feels dense. The important concepts are activities, the special first receiver activity, message templates, the binding tree, transformers, filters, variables, and message logs. Once those are clear, the step-by-step tutorials become much easier to follow.
How to read the designer
The Workflow Designer is divided into three working areas. The left side is the workflow itself: a list of activities that will run in order. The center shows the details for whichever activity is selected. The right side gives you the supporting tools, especially the binding/message tree and the message logs.
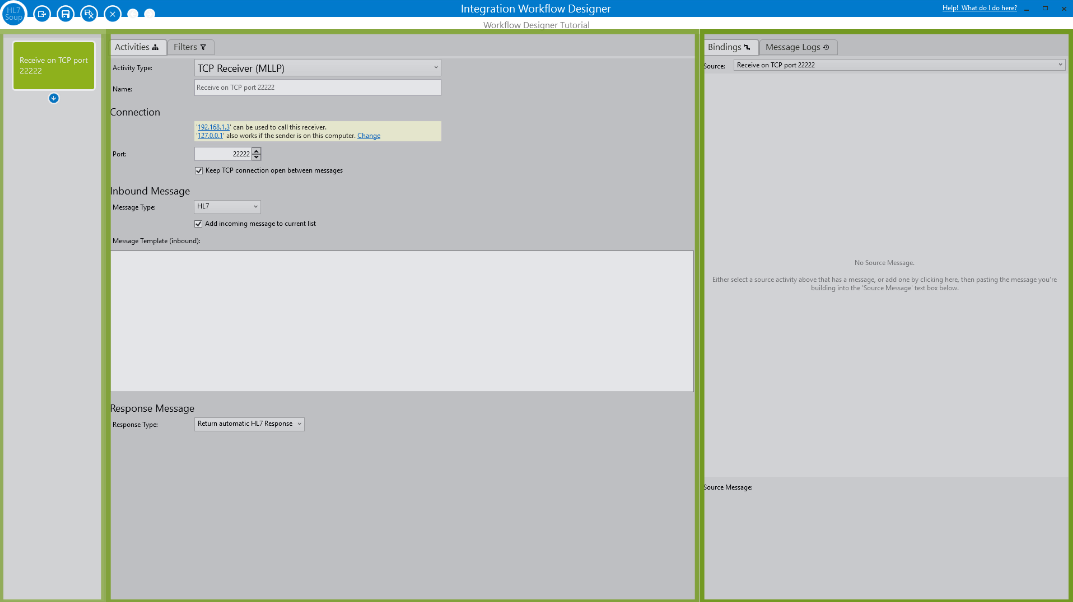
- Activities: each step in the workflow, such as receiving by TCP, sending to a web service, querying a database, writing a file, or running C# code.
- Activity details: the settings, message template, transformers, filters, and response behavior for the activity you currently have selected.
- Binding tree and logs: the source values you can drag into messages or transformers, plus the execution history you use to debug what actually happened.
Activities, receivers, and message templates
The first activity is special. It is the receiver activity, and it defines what starts the workflow. A receiver might listen for TCP/MLLP HL7, watch a directory, receive HTTP or SOAP requests, query a database, or use another trigger. Because it starts the workflow, the receiver cannot be moved or deleted like later activities.
Activities after the receiver usually send, write, transform, or enrich data. A TCP Sender might forward the message to another system. A File Writer might create an output file. A Database Query might look up values or write records. These activity choices define where data moves, but the conversion logic lives in message templates, bindings, and transformers.
The Message Template is one of the most important fields in the designer. On a receiver, it is an example of the inbound message. Paste a realistic sample when you have one, because it lets the binding tree show the fields you will map later. On later activities, the Message Template is usually the outbound message that activity will send or write.
Practical rule: if a field is missing from the binding tree, add that field to the sample Message Template. The designer uses the template structure to make drag-and-drop mapping possible.
Bindings, variables, and transformers
When a new activity is added after the receiver, its template is often bound to the receiver's inbound message. That is useful for relay workflows where the message should pass through mostly unchanged. If you are converting HL7 to CSV, XML, JSON, text, a database command, or another HL7 shape, start by replacing that default binding with an example of the message you want to create.
The binding tree lets you drag source fields directly into a Message Template. At runtime, the purple placeholders are replaced by real values from the selected activity, response, or variable. The drop-down at the top of the tree changes which activity you are reading from, so a later activity can map values from the receiver, from a previous activity response, or from variables created earlier in the workflow.
Transformers give you a more explicit way to map and prepare data. A mapping transformer connects a source path to a destination path. A Set Variable transformer creates or updates a variable. Conditional transformers let you run a block only when criteria match. For Each and Next let you loop over repeated values such as OBX segments. Comments keep complex transformer lists readable, and Code transformers let C# developers use the HL7 Soup API directly.
The anchor button beside a source value is a small detail that matters. If it points to an activity, the value is treated as a path into that activity's message. If it points to Text and Variables, the value is treated as literal text, with any inserted variables expanded at runtime.
Path syntax quick reference
Most mappings are just paths that identify where data comes from and where it should go. The designer supports the common path conventions for each message type.
| Message type | Path style | Example |
|---|---|---|
| HL7 | Segment, field, component, and subcomponent. Repeating segments and fields can include indexes. If an index is omitted, the first value is assumed. | PID-5.1 |
| FHIR, XML, JSON | Simplified XPath using forward slashes for hierarchy. Attributes start with @. Strict .NET XPath can be prefixed with xpath: when needed. |
/Patient/name/family |
| CSV | Field index in square brackets. | [3] |
Formatting and escaping
HL7 work almost always needs some formatting. Dates may need to be converted for a database or a human-readable CSV. Names may need title casing or McName-style capitalization. IDs may need padding. Anywhere a value is bindable, including variables, you can usually right-click and apply a date, number, text, or escaping format.
By default, mappings protect message structure by escaping reserved characters. That keeps values such as XML ampersands or HL7 separators from corrupting the output message. Only use Allow message structure to change when you intentionally want inserted values to alter the structure of the outgoing message.
Filters and execution order
Filters decide whether an activity runs. If an ordinary activity is filtered out, the workflow continues to the next activity. If the receiver is filtered out, the workflow stops because the message was rejected before the rest of the workflow began. Filters can use the same criteria style as Conditional transformers, including And, Or, and grouped logic.
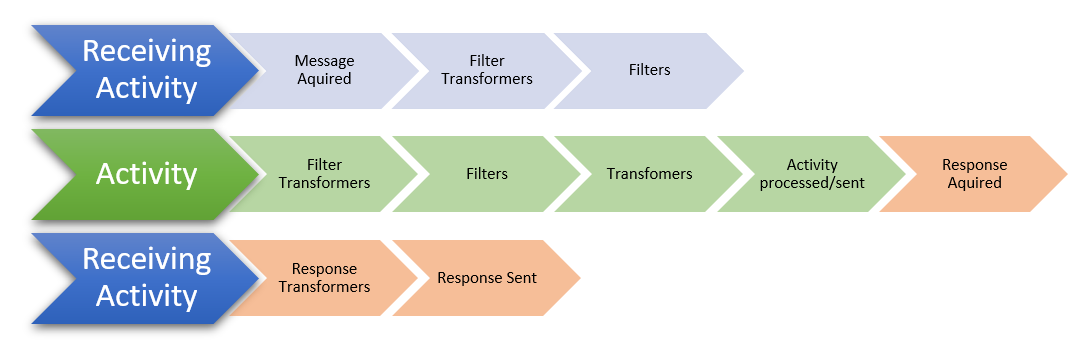
Execution order is the detail that saves a lot of confusion. Receiver filter transformers run first, then receiver filters. Each downstream activity then runs its own filter transformers, filters, main transformers, and main action. If an activity expects a response, it waits for that response. After all downstream activities have finished, control returns to the receiver, where response transformers can prepare the message that goes back to the sender.
Common gotcha: do not try to prepare a later activity's outbound message in the receiver response transformers. Those run at the end, when the workflow is preparing the receiver's response.
Text, binary, and message logs
Text and Binary messages are less structured than HL7, XML, JSON, CSV, or FHIR. Text can be useful when you want to build a blob of output with variables, such as multiline CSV from repeated OBX values or hand-built JSON text. Because text has no parsed structure, it cannot be mapped field-by-field in the same way.
Binary messages preserve files such as PDFs and images that would be corrupted if treated as text. The File Writer can also write Base64-encoded data out as a binary file.
Message logs are the debugging view for the designer. They record the messages sent and received by the workflow and its activities, variable values at execution time, errors, duration, and timestamps. In the HL7 Soup editor, recent executions are held while the app is open. In Integration Host, logs are persisted and can give you a much longer history.
Clicking an HL7 message in the logs can highlight the current path in the Message Template, binding tree, and transformers. That makes it much faster to trace a bad binding or find the transformer that used a faulty field.
What to watch next
- Integration Host Getting Started Part One
- Integration Host Getting Started Part Two
- Write HL7 messages directly into a database
- Create HL7 messages from database records
- Convert XML messages to HL7
- HL7 C# code cheat sheet
- Create custom transformers for HL7 Soup
- Return to the HL7 tutorial directory
Video Transcript
Read the full transcript
Welcome to the HL7 Soup and Integration Host Workflow Designer.
With it, you can transform HL7 messages to and from different formats such as JSON, CSV, or XML. You can also send and receive messages via TCP, HTTPS, databases, web services, and more, or even enable HL7 in your products.
This video delves into many places that none of our other videos do, and it is essential viewing for mastery of HL7 interfaces. Once you have reached the end, be sure to check out our many tutorials that give step-by-step instructions on how to perform various tasks.
The Workflow Designer is divided into three. On the very left is the list of steps that will be performed. We call the individual steps activities, and the list is called a workflow. Activities can be added by clicking the Add New button. You can insert activities between others, reorder them by dragging and dropping, delete them, disable them so they are not validated or executed, and enable them again.
The first activity is a special one. It cannot be moved or deleted because it defines the action that starts the execution of the workflow. We call this first activity the receiver activity.
The center section shows the details of the activity that is currently selected. Clicking another activity jumps to its details.
The action performed by each activity is selectable at the top of the details panel. Common use cases such as TCP, HTTPS, web services, and databases are all supported, and there is even a Code activity if you think some C# would help. The list of available activities is extensible and can be expanded by the team at HL7 Soup, or you can create your own in .NET.
It is worth noting that the available list of activity types differs for the receiver activity, because these are trigger actions that start an instance of the workflow and acquire the inbound message. Activities after the first often focus on sending the message to other systems, but some can obtain additional data too. Nothing at this level represents how we will alter or convert the data. We will get to that shortly.
As we switch between activity types, we get a set of options relevant to performing the action. Other tutorials go into the configuration of these activities in detail, so I will skip most of the settings and jump down to the Message Template, a key field in almost every activity type.
For receiving activities, the Message Template represents an example of the inbound message. If you have one, paste it in. It is not required to proceed, but it significantly improves the ease of mapping your messages. Some samples are available in the right-click menu if you do not have a message handy. Notice that as I add the Message Template, the bindings panel on the right is populated with a tree structure representing this message.
We will see what can be done with the binding panel shortly, but for now, notice how clicking a field in the Message Template selects the corresponding item in the bindings panel and vice versa. Also, if we edit the message and add or delete a field, it will be reflected almost immediately in the binding panel. If a field you need is missing from the binding panel, just add it to the Message Template.
For any activity after the receiver, the Message Template represents the outbound message. For instance, it is the message being sent on a TCP sender or the file being written in a file writer.
When the activity was created, it automatically had its Message Template populated with a binding to the receiver's inbound message. That is what this blue highlighted text represents. This activity will send on the same message that the workflow initially received, though alterations are possible. I can delete this binding like any other piece of text, or add it back again by right-clicking, selecting Insert Activity Message, and then selecting which activity. It does not need to be the receiver activity either. It could just as easily use the message sent or returned by any preceding activity.
Using message templates with bindings is a great way to relay a message between systems with minor alterations. If you are converting between different message types, or making substantial changes within the same message type, start by deleting the binding, inserting an example of the message you will be converting to, and setting the message type.
If we ran this workflow now it would wait for an inbound message, then send this message exactly as it is written here. That is our general plan and, along with relays, it is a very common workflow scenario. What is missing is how we alter or map the incoming values into this outbound message.
There are several ways to map values from one message to another. One of the simplest is to use the binding tree that populated earlier. See how I can drag fields from the binding tree directly into a Message Template. At runtime, these purple placeholders will be replaced with the source value.
Notice the drop-down at the top of the binding tree. This enables you to select which activity you want to get your data from. It defaults to the receiver's inbound message, but you can mix and match from any previous activity, or even from values stored in memory called variables. More on those shortly.
First, let us click on the Transformers tab of the activity details and look at other ways of mapping values. Each activity has its own list of transformers that are executed just before the message is sent out. Transformers are a list of steps that define how values are mapped between messages.
The center Transformers panel lists all the steps and mappings that will be performed, while the trees on either side represent where you can acquire data from and where in your outbound message it can go. These trees are constructed from your message templates. The source tree is functionally just like the binding tree, and you can use them interchangeably. If you do not have a source tree available in your version of the designer, use the binding tree instead.
By dragging a field from the source tree to a field in the destination tree, we create a transformer that maps the value across. You can potentially map all of your fields this way, mapping one field to another until you have mapped them all. Clicking a field in a tree highlights all transformers that use it. Alternatively, selecting a mapping transformer highlights the corresponding field in the trees.
Details of the current transformer are shown down in the details panel. The To and Source Path fields are populated with syntax representing where in the message to get and set values. You can change the paths by dragging in different paths from the relevant tree, or by manually typing. The path does not need to be in your Message Template either. The source path might represent a value that may not always exist. If the To path does not exist in your Message Template, it will be automatically appended with the appropriate message structure.
The path syntaxes are common to other systems and based on common standards. HL7 uses the segment name, dash, field, dot, component, dot, subcomponent. Each of these can include an index for repeated segments or fields. If indexes are omitted, the first instance is assumed.
FHIR, XML, and JSON use a simplified XPath syntax, separating the hierarchy of nodes with a forward slash and signifying attributes with a name that starts with an at sign. If you require strict .NET XPath, preface the path with xpath:, but this is generally not required.
A CSV path is just the index of the field in square brackets.
At the end of the Source Path, you can see an anchor button. Clicking it lets you select which activity your path is acquiring data from. Of note is Text and Variables at the top. Selecting Text and Variables means that this text now represents a literal value rather than a path. Notice how the text color changes to blue.
A standard throughout the Workflow Designer is that any text that supports binding is colored: green if it is a path bound to an activity, red if it is bound to an activity but the path is invalid, and blue if it is Text and Variables, with variables shown in purple.
Now that I have selected Text and Variables, whatever I type here will be literally put in the message. If you start finding paths in your outbound message, it is because you need to set the source activity via the anchor button to an activity rather than Text and Variables.
Text and Variables also allows you to insert variables into the text. If I right-click, I can select a variable to insert. Some default variables are always available, such as the date of the message, but any variable you create will also be listed here. What is more, I can add multiple variables along with literal text to build up complex strings of text.
Then there is the Allow message structure to change checkbox. By default it is not selected, and that means any characters reserved for that message type, such as ampersands in XML or HL7, will be automatically encoded or escaped so they do not corrupt the message. If you check this box, you can include message-structure-altering characters and build the message on the fly.
There are many transformer types available. Set Variable Value either creates a variable or alters the value of an existing one. Once I create a variable, it becomes available to use in mappings or other transformers. A shortcut to create a variable populated from a message field is to drop a source value directly into the transformers list, and a variable will be generated already bound to that source. You may want to edit the name, though it is not essential.
Remember earlier when we dragged from the binding tree directly into the Message Template? Behind the scenes, that created a Set Variable transformer populated by its source, then put a variable placeholder into the message. The same thing could have been done manually too.
You set the values of variables using much the same techniques as we did in mappings, though it is worth noting the Sample Value text box. This is a design-time helper that allows the binding trees to include fields that are created by variables, which is convenient if you are altering the message structure with a variable but still want easy drag-and-drop mapping.
The Begin Conditional and End Conditional transformers add as a pair, and transformers placed between them only execute if the conditions are met. You can add multiple criteria arguments and adjust whether they are And or Or comparisons. Complex criteria can be created by adding groups, which act like brackets in your criteria logic.
The For Each and Next transformers allow looping over repeated values, such as repeated OBX values. For any transformer executed between the For Each and Next pair, any binding or mapping that references something in the loop item will take the value of the iterated item instead. There is an example of this in our XML to HL7 tutorial if you want to see it in action.
The Comment transformer allows you to add comments into your transformers tree, which is helpful when things get complicated.
Adding a Code transformer lets you write C# code to perform just about anything you want. If you are a C# developer, you may wish to do all or some of the transformations in code. There is a fantastic API for HL7 included too, with IntelliSense and more. It is beyond this video, but check out the Coding Cheat Sheet in our tutorials if you want to know more.
You can even create your own transformers with Visual Studio that are easily distributable. See our Custom Transformers tutorial for details.
At times you may need to format your data. Dates are almost always formatted with HL7 integrations. Fortunately, everywhere that accepts a mapping or is bindable supports easy formatting, as does every variable. I can right-click and select the format of my choice. There is even the ability to create your own format if it is not on the list.
Dates are not the only thing either. You can make sure your IDs are padded with zeros and your names are capitalized correctly. Using McName casing even formats surnames and addresses with complex capitalization correctly. That will keep Mr. McDonald happy.
You saw earlier that mapping transformers are encoded and escaped correctly by default. You can also escape variables with a simple right-click option.
Filters are another tab available in the activity details. Filters can be used to control which activities execute based on the data. Provided the criteria evaluates to true, the activity will be executed. An activity that is filtered will not execute, and the workflow will continue to the next activity. However, if a receiver activity is filtered, no further activities will be executed.
Filters have the same logic creation abilities as Conditional transformers. Ands, Ors, and groups are available. Using the binding tree is a great way to specify which fields are going to be examined. Dragging in creates criteria already mapped to the path, while dragging in while holding Shift maps that path to a variable and bases the criteria on that. Also, do not forget the autogenerated variables. WorkflowError is always available. It is false when everything is fine and true if something has failed.
The filters happen before the main function of the activity executes, so they have their own transformers list in case you need to create variables or perform some other task. You probably will not need to touch these transformers, but it is worth knowing they are there.
Now is the perfect time to show the execution order. As you can see, the message comes in, any filter transformers are executed, and then the receiving activity's filters run. Provided the message was not filtered and there are other activities, we proceed to the first activity. Its filter transformers are processed, ready for the filters to follow. Provided the activity is not filtered, the main transformers execute, which maps your messages together, and the activity is processed or sent depending on its function. If it is configured to get back a response, it will wait for that to be returned.
There can, of course, be many activities, so that green section will repeat for each of them until all activities have been processed or filtered. Finally, we return control back to the receiving activity, execute the response transformers preparing the message to return, and finally send it back.
Not all receiver activities respond back, such as the directory scanner. Some others that can respond default to automatically generated responses, such as the MLLP receiver. These will not have response transformers and will not have the Transformers tab shown on the details panel. Remember that transformers in a receiver activity execute after all activities, so do not accidentally try transforming data for other activities there.
A navigation tip: when navigating activities, you may also click the icons to go directly to the Transformers or Filters for the activity.
Two message types are perhaps less obvious than the others: Text and Binary. You cannot use these in message mappings because they do not have any message structure to parse into fields. However, they can be populated with variables or direct activity binding, and they may be very helpful.
Text is just a simple blob of text, which can be built up by appending variables into it. Because it has no structure, it is not validated for correctness. This allows you to construct other message types with more freedom. For instance, you can create multiline CSV from OBX values found in a single message, or build JSON message structure with variables.
Binary messages are used to preserve binary files like PDFs or images that would be corrupted if converted to text. The File Writer will also write Base64-encoded data to a binary file.
Finally, in the right column, we have the Message Logs. They list the most recent 1000 workflow executions since the app was loaded in the HL7 Soup editor. In Integration Host, the logs are persisted and can be a much more extensive history.
Message logs record the messages your workflow and activities send and receive, variable values when activities execute, error messages, and the duration and time of the execution. They are critical for debugging your workflows, so it is helpful to keep them handy while editing and designing.
If an HL7 message is clicked in the logs, the current path is highlighted in the Message Template, the binding tree, and the transformers. For instance, clicking on a faulty binding value in the logs will automatically highlight any transformer that refers to that field.
If this video helped you, why not consider subscribing or return the favor and give us a like. Do not forget to check out our tutorial library, where we have step-by-step instructions for many workflow scenarios.