
Add repeating HL7 values to CSV
What this tutorial builds
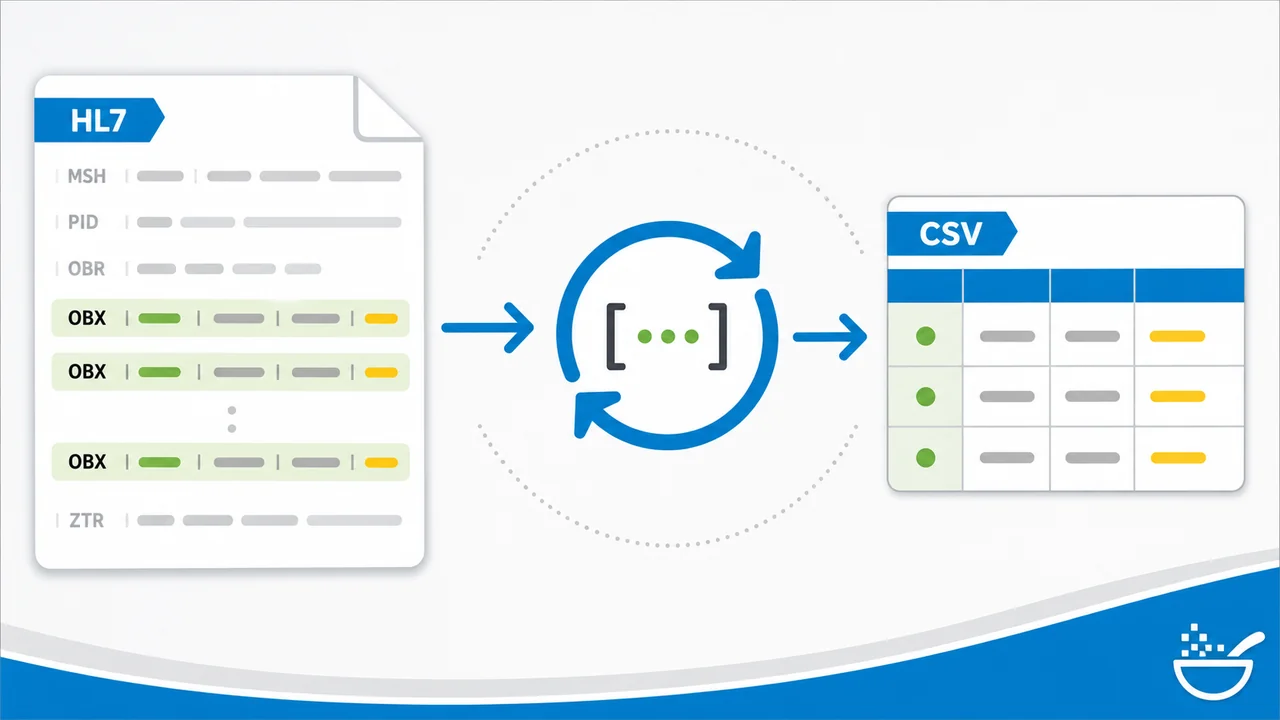
This tutorial shows how to take repeating HL7 values, such as a list of OBX observations, and put them into a CSV file. Instead of transforming one HL7 message into one CSV record, the workflow turns one HL7 message into multiple CSV rows: one row for each repeated OBX value.
The example keeps the patient ID, first name, and last name the same on every row, then changes the observation value for each OBX repeat. The finished CSV can be loaded into Excel or another application for reporting, review, or downstream processing.
Before you start
- HL7 Soup and Integration Host installed.
- An HL7 message with repeated OBX segments, or one of the sample HL7 Soup messages that includes OBX values.
- A folder where the File Writer activity can create test CSV files.
- Excel or another CSV viewer so you can inspect the output rows.
- A basic understanding of Integration Host workflows. If you are new to the designer, start with the getting started tutorials linked below.
The CSV shape
The simple example writes patient values plus one observation value per row. The header is created manually because the workflow is building a full text document, not a single CSV record.
ID,Firstname,Lastname,Value
12345,John,Smith,First OBX-5 value
12345,John,Smith,Second OBX-5 value
12345,John,Smith,Third OBX-5 value
Use the Text message type in the File Writer for this pattern. The CSV message type is useful for single-record mapping, but here the workflow needs to construct the header and every repeated line itself.
Step-by-step guide
- Identify the fields you want in the CSV. In the sample message, the patient ID, first name, and last name stay the same for every row. The OBX-5 observation value repeats and creates the changing CSV value.
- Create a new Integration Host workflow. Use a TCP Receiver for the example, name the workflow
Add Repeat Values to CSV, and receive HL7 messages on port22222. A Directory Scanner would also work when the real source is files. - Insert a sample HL7 message. Add a default message template that contains OBX segments so the binding tree can show the fields you need.
- Add a File Writer activity. Name it
Write CSVand set the file name to something likeFile.csv. - Make each file name unique. Drag the message control ID into the file name. That appends the control ID so each incoming HL7 message gets its own output file.
- Set the File Writer message type to Text. This lets you build the full CSV file manually instead of asking the CSV message type to manage a single record.
- Type the CSV header line. Remove the default text and type a header such as
ID,Firstname,Lastname,Value. - Create variables for the repeated output. In Transformers, drag the patient ID, patient family name, patient given name, and OBX-5 observation value into the transformer list. Integration Host creates variables from those dragged fields.
- Add a For Each around the OBX value. Drag the OBX observation value into a
For Eachtransformer. Put the OBX observation value inside that loop because only that value repeats. The patient values are set once and reused on every row. - Append a CSV line for each repeat. Add an
Append Linetransformer and switch the source to Variables. Build the line from patient ID, first name, last name, and the current observation value, with commas between each variable. - Format values before writing. If names need consistent casing, right-click the name variable and use
Format Text and Names. If you add dates, format them for your local Excel or database-friendly format rather than leaving them as raw HL7 dates. - CSV-encode fields that may contain commas. If an OBX value can contain a comma, right-click the observation value, choose
Encode (Escape Characters), and then chooseCSV Encode. This wraps comma-containing values in quotes so the comma is treated as text, not as a column separator. - Send a test HL7 message. Use HL7 Soup to send a sample message to port
22222. Check the Integration Host logs, then open the generated CSV file in Excel. - Refine the OBX path if needed. If the CSV still contains component separators such as carets, edit the workflow and map
OBX-5.1instead of all ofOBX-5. That keeps only the first component of the observation value. - Test again with another sample message. Confirm the output file name is unique, the rows line up in Excel, and any embedded commas are quoted correctly.
Useful screenshots

Why CSV Encode matters
A manually built CSV line is just text, so commas inside your values can break the shape of the file. If an observation value contains a comma, Excel will treat that comma as a new column unless the value is quoted correctly.
Using CSV Encode on the observation value makes Integration Host write values in proper CSV format. A value such as Left arm, sitting is written as a quoted field, so it stays in one CSV column when opened in Excel.
Useful checks and troubleshooting
- The CSV only has one row: check that the repeated OBX value is inside a
For Eachtransformer and that theAppend Lineruns inside that loop. - Rows have too many columns: CSV-encode any field that may contain commas, especially free-text OBX values.
- Values show carets in Excel: use a component path such as
OBX-5.1when you only want the first component of a composite OBX value. - Output files overwrite each other: include the HL7 message control ID in the File Writer file name.
- Dates look wrong in Excel: format HL7 date values before appending them to the CSV row.
Related tutorials
- Integration Host Getting Started
- Integration Host Getting Started Part 2
- Transform HL7 messages with Integration Host
- Send HL7 data to Excel / CSV
- Return to the HL7 tutorial directory
Download 30 Day Free Trial of HL7 Soup
Video Transcript
Read the full transcript
Hello and welcome to this tutorial, where we look at adding repeated OBX values into a CSV file. And not just OBX: any other repeated value that you want to get into a CSV, this tutorial will show you how to do it.
For example, let's have a look at some of the messages that come with HL7 Soup. We can see here that we've got a selection of fields highlighted. These are the ones that I want to put into a CSV file. We've got the patient's ID, their first name, their last name, and then we also want to get all the result values out of the OBXs.
We can see there is this number, and we want the OBX-5 values from each of these OBXs. You can see there's actually a number of OBX values here, and we want to get all of those values and put them into a CSV file that we can either load in another application or load into Excel.
What's different about this from most transformations is that instead of transforming one HL7 message into one CSV record, we're taking one HL7 message and converting it into multiple rows of CSV. Effectively, we're creating a single CSV file that's going to have multiple rows depending on each of the OBX values.
So how do we do that? I'll start by loading up Integration Host. If you haven't already seen the introduction videos to Integration Host, I suggest that you take a look at those at the end of this tutorial. I'm going to assume you already know a thing or two about it, so I'm just going to click New and begin.
We've got a couple of options here, common ways of receiving an HL7 message for this type of thing. Often it could be as a file. We could use the Directory Scanner and actually scan the directory. I've done that already in another tutorial, so in this one we're going to use a TCP Receiver instead.
I'll give the workflow a nice name first. It's going to be called Add Repeat Values to CSV, and I'm going to receive on port 22222. As always, we're going to add in a default message template. I'll just use one of the sample messages. I want to use this one, which has an OBX segment in it.
Then we want to send that off to a file, so I'm going to add another activity and set this one as a File Writer. I'm going to call it Write CSV and give it a file name. We'll call it File.csv, and I want to make sure it's unique for each HL7 message that comes in.
So I'm going to drag in the message control ID and place that into the file name. That will append the control ID to each file so they'll be uniquely labeled.
You'd expect me to choose CSV as the type, but because we're doing multiple messages into one, we're actually better off choosing Text. The reason is that we're going to construct the entire message in one go. CSV would hinder us because it would be trying to enforce that single-record policy.
I'm just going to remove the text that's there in the message. Because it's not CSV, we can provide the header manually. I'm going to type that in: ID, Firstname, Lastname, Value. The ID, first name, and last name will be the same for every single record. It's the value that we're going to have change per OBX value. This is just a simple example to show the principles involved.
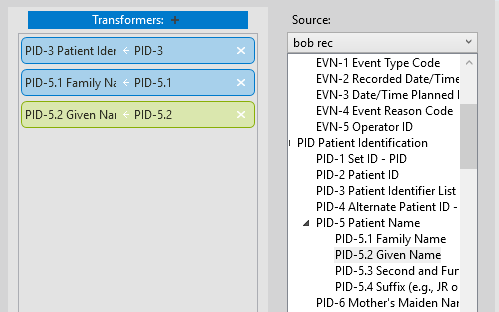
Right, so that's the header in place. Let's construct the lines. We're going to head into the Transformers, and the first thing we're going to do is bring in those fields that we need and put them in as variables. We're going to select the patient's ID, and I'm just going to drag that into the Transformers list. Notice that automatically creates the patient ID as a variable.
We'll do the same for the family name of the patient, the given name of the patient, and the other field we wanted from the OBX: OBX-5, the observation value.
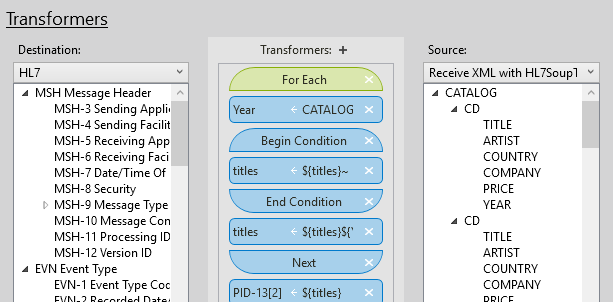
Now I'm going to add in a For Each because we want to loop over every single OBX value. I just drag that OBX value in, and because of that, we're going to want to put this OBX value inside the For Each. That's because all the other values are only needed to be set once. Only the observation value is actually going to repeat.
Now we've got to write out the line. I'll select the Transformers and add an Append Line. Into that, all we have to do is build up our line of text that represents CSV. Probably the easiest way to do that is to change the source of this to point to our variables. Notice it lists all the variables that we just created, so I can drag those and drop them into the source path of our appended text: patient ID, comma, patient's first name, comma, family name, comma, and the observation value.
You can see now we've constructed a line with comma-separated values separating those variables. It's going to repeat for each of the For Each items and write the file out.
That all makes good sense. About the only thing to add is that you may want to format some of those values. The options are to click on your family name, and we can make sure the casing of that is always correct. I can go to Format Text and Names, and I'm going to give it the nickname casing. Obviously, if you had any dates and you were going to Excel, you'd want to convert that to your local date format so it shows correctly in Excel rather than the HL7 date format.
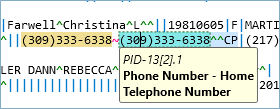
Also, quite critically, if you've got commas that appear inside any of your values, they would corrupt this text by adding an additional comma and changing the structure of the message. You don't want that to happen. I happen to know in the sample values we do actually have a comma in one of our observation values.
So what I have to do is right-click on that observation value variable, select to encode it, and encode it for CSV. What that will do is look at the contents of that value, and if there's a comma inside it, it's going to put it inside quotes, which is the CSV format. It will make sure that comma is treated as text and not as structure in the CSV format.
With that, the workflow is completed. I'm going to save and close that and head back. You can see it's already running, so I'm just going to use the sample messages in HL7 Soup to try this out.
I'll click on this one so we can see it's got a number of rows of OBXs. It should be good, so I'm just going to send that through. We use the same port, 22222. I'll click Send, and here's our response.
If I go across to the Integrations tab here, this is HL7 Soup's view of Integration Host. It's the same thing as going to Integration Host, and you can see it's worked. I can refresh the logs, and we can see the values coming in. Indeed, it seems to have written out correctly.
If we have a look at the file system, the CSV has been created. Let's take a look and see how it went. I'm going to open it up in Excel, and we can see that it has loaded and populated all the fields.
We do have a little bit of a problem here. I notice some of those fields still have the carets in them. That's because OBX-5.1 did have components in it. So let's go back and edit that workflow to fix it. I'll do that from the Integrations tab, load up that workflow pattern again, go to Transformers, and select the observation value. I'll make that choose the 5.1 value instead. That way, if there are components in there, we'll only get the first item of OBX-5.
Save and close that, and let's try again with the other message now. Choose this one and hit Send. Again we've got success. I'll head over to the file system, and here's our next file created. Note that the file name has been given a unique name as we designed.
I'll load that, and here it is loaded up into Excel. Again, you'll see it's all laid out correctly.
I will quickly jump across to Integration Host. I just want to show you inside the logs. We refresh the logs and look at that first item where it wrote it out. Now that we've selected the right activity, you'll notice this line here has a comma in it. That was the comma inside the actual text, and you'll notice it's put quotes around that particular row. It's done the same thing here as well, and that's what encoding for CSV did for us with a simple right-click option.
As always, if these videos have helped you, why not consider returning the favor? Give us a like and subscribe to our video feed on YouTube. We've got constant videos coming out all the time that will help make you an HL7 expert, and we'd love to hear any feedback that you've got for us or suggestions for future videos.