
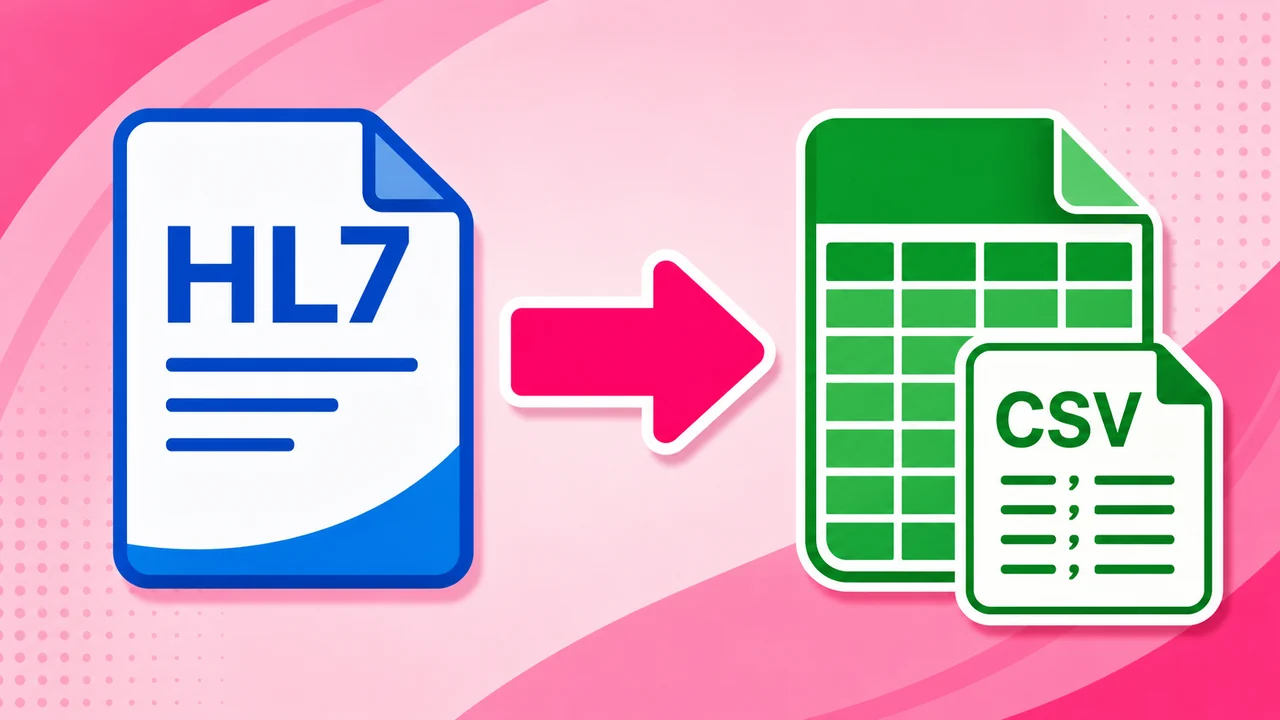
Send HL7 messages to Excel / CSV
What this tutorial builds
This tutorial builds a practical HL7 Soup workflow that receives HL7 messages, extracts patient values, and writes those values into a CSV file. Excel can open the CSV directly, so this is a useful pattern when clinical or operations teams need HL7 data in a spreadsheet for review, reporting, or follow-up analysis.
The example receives HL7 over TCP on port 22222, maps values from PID into patient CSV columns, inserts a processing date with the built-in CurrentDateTime variable, filters the workflow to ADT messages, and then extends the File Writer path so different event types can go into different output files.
Before you start
- HL7 Soup and Integration Host installed. The free trial is enough to follow the workflow.
- An HL7 ADT message, or one of the sample messages included with HL7 Soup.
- A writable output folder such as
C:\temp. - Excel or another CSV viewer so you can inspect the generated file.
- A basic sense of Transformers. The tutorial uses simple drag-and-drop mappings; the full Transformers tutorial is linked below if you want the deeper version.
Workflow layout
A receiving workflow runs once for each inbound message. The green receiver activity defines where the message comes from, and each activity below it performs the next action, such as writing a file or sending a message somewhere else.
The message logs on the right are especially useful while testing. They show each received message, the processing dates, the activity details, the source and response messages, and any errors that occurred.
Step-by-step guide
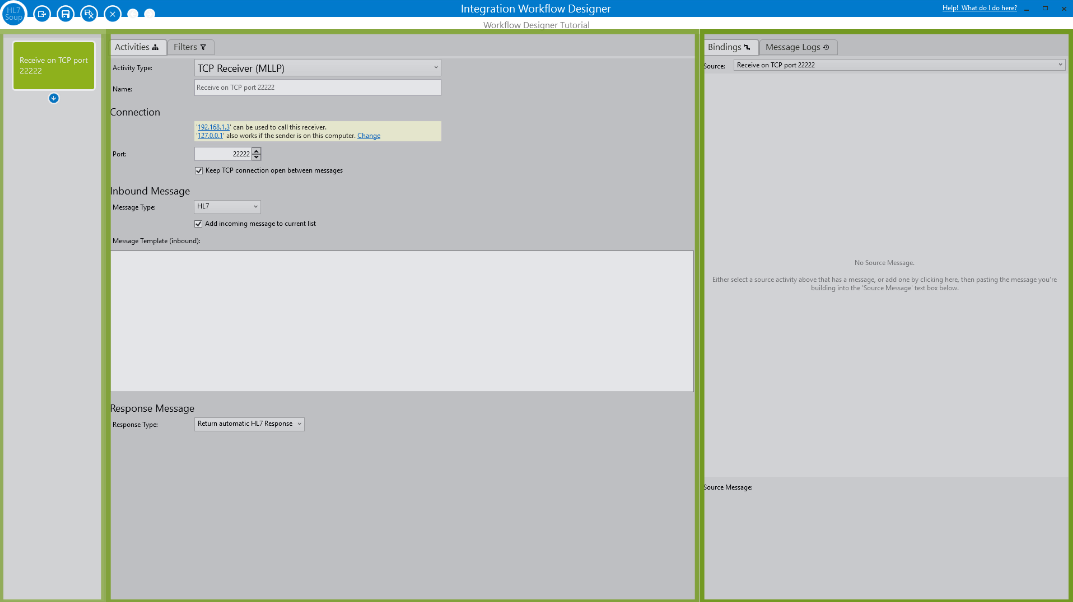
- Create a new receiving workflow. Start from the receiving workflow designer. The same idea works for a Directory Scanner, but this tutorial uses TCP because it is the common HL7 transport.
- Configure the inbound TCP receiver. Leave the default local server settings, receive on port
22222, and keep the message type as HL7. If you do not need each inbound message loaded into the main HL7 Soup editor, uncheck that option. - Add an inbound message template. Paste a representative HL7 message into the receiver message template. This gives Transformers a real source tree, so fields such as PID-3 and PID-5 are available for mapping.
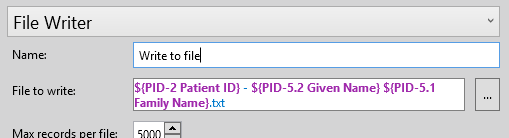
- Configure a File Writer activity. Navigate to the next activity, change it to a File Writer, and choose a path such as
C:\temp\Patients.csv. Set the outbound message type to CSV. - Type the CSV structure. Create a simple CSV message template with the values you want to write. The tutorial uses patient ID, first name, last name, and the date the message was processed.
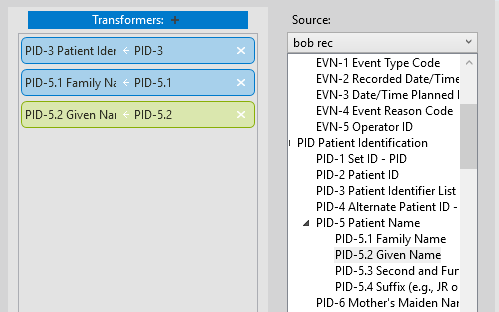
- Open Transformers. The source tree comes from the inbound HL7 message template. The destination tree comes from the CSV message template. The mappings between those two trees are what create the CSV output.
- Map patient name and ID fields. Drag
PID-5.1to the Last Name field,PID-5.2to the First Name field, andPID-3to the patient ID field in the destination CSV. - Insert the processing date. Select the placeholder date text in the destination message template, right-click, and insert the built-in
CurrentDateTimevariable. This writes the current date each time the workflow processes a message. - Remove or disable unused activities. If there is an extra activity you do not need, delete it. If an activity is only temporarily out of use, disable it so it can be enabled again later.
- Add an ADT filter. Open the receiver Filters screen and add a filter where
MSH-9.1equalsADT. That keeps non-ADT messages from being written into this patient CSV workflow. - Save and start the workflow. Save the workflow, return to the main HL7 Soup screen, and click Start Receiving so the receiver listens for HL7 messages.
- Send sample messages through the workflow. Use the HL7 Soup sender to send individual messages, or use the play button to let the automatic sender run messages through.
- Review the message logs. Refresh the workflow logs and expand a message to check the source message, response message, activity details, and any filtered messages.
- Open the CSV in Excel. Because the output is CSV, Excel can open it directly. Check the rows and confirm that the patient ID, first name, last name, and date landed in the expected columns.
- Use the event type in the file name. To split output files by event type, create a variable from
MSH-9.2in Transformers, then insert that variable into the File Writer path. A message event such as A01 or A04 can then become part of the file name.
CSV message shape
The exact CSV template depends on what the spreadsheet needs. For a simple patient extract, start small and keep each column easy to verify while testing.
PatientId,FirstName,LastName,MessageDate
PID-3 value,PID-5.2 value,PID-5.1 value,CurrentDateTime
This tutorial creates a CSV file for Excel to open. It does not create a native .xlsx workbook. For most integration workflows, CSV is easier to produce, inspect, and pass to downstream tools.
Mapping and variables
Transformers let you connect values from the inbound HL7 message to the CSV destination. The source tree and destination tree are generated from the message templates you add to the receiver and File Writer activities.

Useful checks and troubleshooting
- No CSV file appears: check that the workflow is started, the sender is using the same port, and the File Writer path points to a folder the workflow can write to.
- The CSV has blank fields: confirm the inbound message template has the same field layout as the messages you are sending, then recheck the PID mappings in Transformers.
- Messages are grey in the logs: those messages were filtered out. If a message should be processed, check the value in
MSH-9.1and the ADT filter condition. - Files overwrite each other: include a variable such as
MSH-9.2,MSH-10, or another unique value in the File Writer path. - Excel displays dates oddly: format the date variable before writing it, especially if you are mapping an HL7 date field instead of using
CurrentDateTime. - Text values contain commas: use CSV encoding or a CSV-specific mapping pattern so commas inside data do not become extra columns.
Related tutorials
- Transform HL7 data with HL7 Soup
- Add repeating HL7 values to CSV
- Integration Host Getting Started
- Integration Host Getting Started Part 2
- Return to the HL7 tutorial directory
Download 30 Day Free Trial of HL7 Soup
Video Transcript
Read the full transcript
Hello, and welcome to this tutorial about sending HL7 messages to Excel.
We'll start by heading over to HL7 Soup. There is a free 30-day trial if you would like to follow along.
We'll start by creating a new receiving workflow, and we can choose whether our HL7 message will be sent in by a directory scan or from TCP. But first I'll give you a quick overview on how to work with workflows.
The green box up the top here represents the configuration of the receiving activity. Watch what happens when I click here: in drops an activity to follow the receiver. Click again, and here's another. We can build a workflow that runs for each received message.
Before I get ahead of myself, let's give you an overview of our receiver configuration screen.
Here, as you might have guessed, is the workflow view panel. It helps you navigate your workflow with ease. Click any activity and you jump straight to viewing its details. You can even jump directly into the activity filters or Transformers by clicking these buttons here. We'll explain more about these shortly. Notice also that you can adjust the order of your activities with a simple drag and drop. Easy.
This central section is the activity details panel. Here you configure the properties of the receiver or its activities. It's also the place to adjust what your activities do. It was going to send it to another TCP address, but now the message will be written to a file.
On the right we have the message logs. Here you can search for and look at the messages that have been received by this workflow. We'll come back here shortly and I'll show you more once I have sent a message.
Across the top here are the window controls. From right to left we firstly have a link for help, then forward and back navigator buttons so I can traverse the workflow screens easier. Then the close window button, Save and Close, Save, and Export.
Let's quickly create a real workflow. I'll make a pattern that receives an HL7 message, then extracts the patient's details and writes them into a CSV file that can be loaded into Excel for further analysis.
Firstly I navigate to my receiving activity, and I'm going to select that it will come in from TCP, which is the HL7 standard. I'm happy to take the default server settings and accept this message into port 22222. The message type will be HL7, but we could also accept XML or CSV. I don't need the inbound message to be loaded into HL7 Soup's main screen, so I'll uncheck here, and I just want the response message to be handled for me after all the activities have been processed.
Finally, I'm going to paste a message template here. This is a message that looks like what most of my inbound messages will be. This will help me later, and I'll show you how soon.
Before that though, let's configure how we will write this CSV file out. I'll navigate to this activity, and we will change it to a File Writer. Now I just give it a file location, say C:\temp\Patients.csv, and we will set the message type to CSV.
Once again I'm going to put in a message template. I could just bind this in from another activity like so, but as we're creating a new message, I will just type in my CSV message structure. I want it to show the patient's ID, first name, last name, and the date of the message, so I type them in.
Now comes the fun part. We are going to map the values from the inbound HL7 message to the CSV message, and we do that with Transformers. Let's click here to edit them.
Transformers are an incredibly powerful feature, with capabilities well beyond the scope of this video, but if you click the link here you can watch our Transformers video that goes into much greater depth.
For now though, notice we have a source tree and a destination tree that are generated from the message templates we placed into the activities. You can edit those message templates here too, and the changes automatically reflect back on the activity properties.
The general goal of Transformers is to take values from the source tree and map them to values in the destination tree. The mappings will show here, and their details show here.
For example, we find the patient's family name in PID-5.1 and drag it across to the Last Name field in our destination tree. We've now created a mapping between the messages that joins the messages together.
Let's now do the same for the patient's first name and their ID. Great. For the date of message, I'm going to do something a little different. I'm going to use a variable directly in the destination message template. I simply select the placeholder text for the date field, right-click, and insert the variable called CurrentDateTime. This message template will now show the current date each time a message is processed.
This CurrentDateTime variable is built in, but you can map your own ones here.
I'm now going to remove this additional activity that I don't need. I can just disable it if it's only a temporary removal. It is worth noting that if a workflow is saved with an activity that is not filled out correctly, it will automatically be disabled. Enable it again like this once you have fixed the problem. But as I'm not going to need it at all, I will just delete it.
OK, one last thing before we run this. I want to create a filter so that we only process ADT messages. Filters can be added to any activity as a form of flow control, but in this case we want to add it to the receiver. Clicking the Filters icon takes us to the filters screen. Here I will add a filter and adjust the address to MSH-9.1, where the value is equal to ADT.
Great, our workflow is written. Let's save it. Then I navigate across to the main HL7 Soup screen and we can test this out. We have to start this workflow running first, and we do that by clicking the Start Receiving button.
Now we can use our sender to start processing some messages. We could send individual messages by clicking here, but I'm going to click the play button and let the automatic sender run them through automatically. I'll leave this to do its thing, and we will go back to the workflow editor and take a look at the logs.
I click the refresh button down here to refresh this list, and we can see the messages coming in. Refresh again, and there are more messages. Notice how the filtered ones show as grey so they are easily identifiable.
Each message has an ID, plus processing and completed dates. We can also expand the message to see the details of the activities too. Each of the activities is also expandable, so you can view the source message, response message, and if we had any errors, they would show and list the details here too.
Let's go look at the file we have created. Because it is CSV, it will load straight into Excel, ready for your analysis.
Let's now go one step further and have HL7 Soup sort the messages into different files. It could be by patient or any other value, but in this sample I'm going to name the file for its event type. All we have to do is edit our receiver again, navigate to our Transformers, and create an MSH-9.2 variable by dragging it from the source message into the Transformers list. Now we have a variable. Just navigate to the File Writer and place it in the file path by right-clicking and selecting our newly created variable.
I'll save this, then send a message through. And look, we have the message type in the file name. Easy.
We hope you found this tutorial useful. Please feel free to post any questions you might have into the comments, and you would help us out greatly if you click Like. Also, you can subscribe to this channel for more videos on the HL7 subject. Thank you.