
HL7 Soup Transformers Tutorial
What this tutorial covers
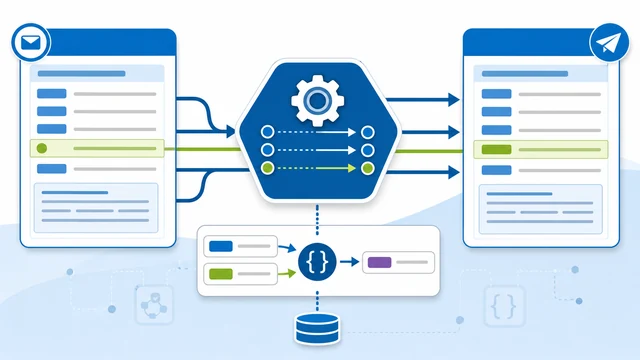
HL7 Soup workflows already make it easy to receive a message and send it, save it, or pass it to another activity. Transformers are the part of the workflow that let you change that message before the activity runs.
This tutorial explains the core transformer screen, how source and destination message trees are built from message templates, and how to map values such as PID-5.1 into an output field. It also shows where variables fit, why transformer order matters, and when a custom .NET transformer is a better choice.
Before you start
- HL7 Soup and Integration Host installed.
- A workflow activity with a message template, such as an HL7 receiver feeding a file writer, sender, or another activity.
- A sample HL7 message with the fields you want to transform.
- A destination message template when you are building a new output message type, such as CSV, XML, or another HL7 message.
Core transformer concepts
- Message template: the base message that the transformer acts on. It can be a realistic sample message, a placeholder showing structure, or a message bound in from another activity.
- Source tree: the values available to drag from the incoming message, another activity response, or Text/Variables.
- Destination tree: the message or fields that this activity will write after the transformers run.
- Mapping transformer: a transformer that copies a source value into a destination path.
- Variable transformer: a transformer that stores a value for later use in paths, message templates, and other transformers.
- Custom transformer: a .NET transformer you write when the transformation is easier or safer to express in code.
Step-by-step guide
- Add message templates to your activities. Use realistic sample messages so HL7 Soup can build useful source and destination trees. The message template is the structure the transformer will work on at runtime.
- Open the Transformers screen. Most activities expose a Transformers button in their details. You can also hover over an activity in the workflow and click the double-circle transformer icon.
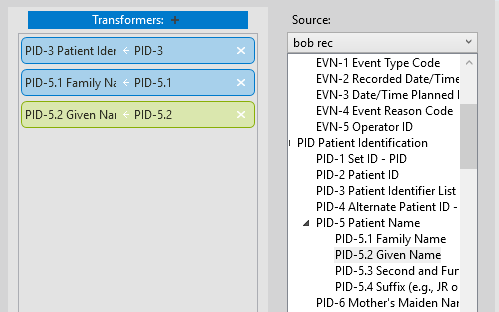
- Find the value in the source tree. In the tutorial, the patient's family name is in
PID-5.1. Expand the source tree until you find the value you want. - Drag the value into the destination tree. Drag
PID-5.1onto the destinationNamefield. HL7 Soup creates a mapping transformer and records the source path, destination path, and source activity. - Change the source activity when the value comes from somewhere else. Select another source activity to repopulate the source tree from that activity's message or response. If an activity does not yet have a response message, paste a sample response into the transformer screen so the tree has something to show.
- Edit existing mappings directly when needed. Click a transformer to view its details. You can adjust the path manually, drag in a new source path, or use the anchor button to choose the activity that supplies the value.
- Create variables for reusable or combined values. Add variable transformers for values such as last name and first name. Variables are useful anywhere you need to reuse a value, including message text and file paths.
- Build a full name variable. Create a
FullNamevariable that combinesLastName, a comma and space, andFirstName. Then change the earlier mapping to use Text/Variables and mapFullNameinto the destinationNamefield. - Check the transformer order. Transformers execute from top to bottom. Put the
LastNameandFirstNamevariables beforeFullName, and putFullNamebefore the mapping that uses it. - Use a custom transformer when code is clearer. The sample custom transformer in the video concatenates first and last names and exposes simple input boxes. Custom transformers can also create variables for you, which keeps repeated business rules tidy.
When to use each transformer type
Use a mapping transformer when one source value should be copied into one destination field. This is the everyday case for moving HL7 values into a new HL7, XML, CSV, or text message.
Use a variable transformer when you need to store a value, combine several values, or reuse the value elsewhere. A patient full name, output file name, or dynamically generated path is a good fit.
Use a custom transformer when the transformation belongs in code: more complicated string handling, repeated business rules, lookup behavior, validation, or anything that is easier to test and debug in Visual Studio.
If a value looks blank at runtime, check the message template, source activity, path, and transformer order before changing the mapping logic. Most transformer issues come from the tree pointing at the wrong source or a variable being used before it has been created.
Useful checks and troubleshooting
- The source tree is empty: add or paste a realistic message template for the source activity or response.
- The destination field does not update: confirm the destination message template contains the field and that the mapping points to the right destination path.
- A variable is blank: move the transformer that creates the variable above any transformer that uses it.
- The wrong activity supplies the value: use the source activity selector or anchor button to point the transformer at the correct activity.
- The logic is getting hard to maintain: consider a custom transformer so the rule can be written and debugged in .NET.
Related tutorials
- Create Custom Transformers for HL7 Soup
- Mastering the Workflow Designer
- Integration Host Getting Started Part Two
- HL7 escape characters
- Return to the HL7 tutorial directory
Download 30 Day Free Trial of HL7 Soup
Video Transcript
Read the full transcript
Hello, and welcome to this tutorial on HL7 Soup Transformers.
HL7 Soup's workflows make it easy to take an inbound message and send it or save it elsewhere, but sometimes you need to edit the values a bit first. Sometimes you have to entirely change the message from one type to another.
These are the problems that transformers are designed to overcome. They transform the message used by an activity with a set of rules and values from other activities.
Most activities in a workflow are attempting to perform an action on a message of some sort. In HL7 Soup, we call this message the message template.
The message template is the base message that the transformer is going to act on. It might just be a placeholder showing your message structure, or it could be a message that is bound in from your receiver or other activities. The important thing is to realize that the value in the message template is what you will be working on in your transformer.
Editing transformers is easy. Most activities have a button in their details, but easier still is the double-circle icon that shows when you put the mouse over an activity in the workflow.
Here is our transformers screen. We have a source tree and a destination tree that are generated from the message templates we placed into the activities.
The general goal of transformers is to take values from the source tree and map them to values in the destination tree. The mappings show in the center, and their details show on the side.
For example, we find the patient's family name in PID-5.1 and drag it across to the Name field in our destination tree. We have now created a mapping between the messages that joins the messages together. Each time this workflow runs our transformer, our destination message template will be updated with the family name from the source.
We can even adjust where our source data comes from. Would you like a certain value to come from another activity? Easy. Just select your source activity here and watch the message tree repopulate, ready to be dragged across. If your activity does not have a response message, you can just paste one in here and it will reflect back in the activity. The same goes for the destination messages, which is handy when you forgot to add your message template earlier.
You can also easily adjust existing transformers. Clicking on a transformer shows its details, and here you can make alterations. Manually adjust the message path, or just drag it in from your source tree. You can even use the anchor button to adjust which activity you are getting your value from.
The type of transformer you have just seen is called a mapping transformer, but there are others. Click here and you can see all that are available to you.
With this one, you can create variables, and I will show you what this means in just a minute. I also want to bring your attention to this transformer. It is my own special transformer that I created. It does whatever I need it to do because I wrote it myself in .NET.
We have a video on creating your own transformers. It is really easy to do and allows you to do just about anything you like when transforming your data. Better yet, you can even debug your transformers with Visual Studio. But all that is in another video that I have linked to in the comments.
Let's take a look at what a variable transformer is for. It creates variables, and variables are simply a place to store values for use elsewhere in the workflow. What is great about them is you can combine variables with fixed text and other variables to create dynamic or complex values.
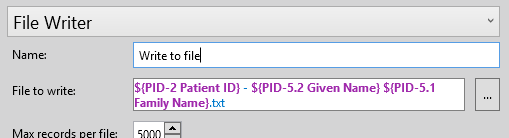
For example, I can put a variable value into a file path of a file I am writing out. I just add the variable, give it a name, navigate to where I want it, and then right-click and insert the variable.
I will head back to my transformers, where you will remember I bound the patient's last name to my Name field earlier. Well, I would actually prefer this was the patient's full name written in the format of LastName, FirstName.
I cannot bind multiple items into my Name field, so I will create variables that merge this text together.
I create a variable for the last name by dragging it in, and I give it the name I want. Now the first name, and I rename it too.
Now I create another variable for the full name. I will give it a sample value, and then just insert the variables in the order of last name, then first name, and place a comma between these. So now our full name variable is ready. We just head over to my earlier transformer, change its source to Text/Variables, and add in the FullName variable. Done.
When transformers are executed, they run in order from top to bottom in this list. That means you have to make sure variables are set in the correct order. There would be no point setting the Name field with the FullName variable if it has not yet been set. Thankfully, you can easily adjust the order with simple drag and drop. I will adjust all of mine into the appropriate order. Great.
To join the names together, I also could have created my own custom transformer, and that could have simplified creating the FullName variable. Fortunately, I can demonstrate this because concatenating the names is exactly what this sample custom transformer does.
If I add it to our transformers list, you will see a place for the first and last names. Now I just drag these into the boxes, and it is ready to go. Custom transformers can automatically create variables for you too, and this one creates a variable called Concatenated Name, so I will set this for my Name field instead.
Do not forget to take a look at our Custom Transformers video, where we show you how simple it is to create your own transformers and even provide you with the sample code.
If you find our videos helpful, then please subscribe to this channel. If you would like to help us out, then please like this video. Thank you.