
Convert HL7 messages to JSON
What this tutorial builds
This tutorial converts an HL7 v2 message into a JSON file with Integration Host. The workflow starts by scanning a folder for inbound HL7 files, uses a sample message to expose the HL7 binding tree, maps patient values from PID into a JSON patient object, and writes one JSON file per message.
The second half handles the part that usually catches people: repeating OBX results. Since the number of OBX segments can change from message to message, the workflow loops over the OBX segments, builds a JSON result object for each one, removes the last trailing comma, and inserts the completed list into a JSON results array.
Before you start
- HL7 Soup and Integration Host installed. The 30-day trial is enough for following the tutorial.
- Basic familiarity with HL7 v2 segment names such as
MSH,PID, andOBX. - An HL7 sample message with patient fields and at least one OBX result.
- A watched input folder, such as
C:\hl7toJSONexample, and an output folder for generated JSON files. - A target JSON shape. The tutorial starts with a patient object, then adds a results array.
Example JSON shape
HL7 and JSON are both structured, but they are not equivalent formats. The workflow does not magically know how your HL7 values should become JSON. You decide the JSON structure, then bind the HL7 values into it.
{
  "patient": {
    "id": "${PID-3}",
    "firstName": "${PID-5.2}",
    "lastName": "${PID-5.1}",
    "dateOfBirth": "${PID-7}"
  },
  "results": [
    ${Result}
  ]
}
Use the sample message only to build the binding tree. Runtime values come from the real HL7 file that lands in the watched folder.
Step-by-step guide
- Create a new Integration Host workflow. From the Integration Host dashboard, right-click the workflow list and choose New. Name the source step something practical, such as
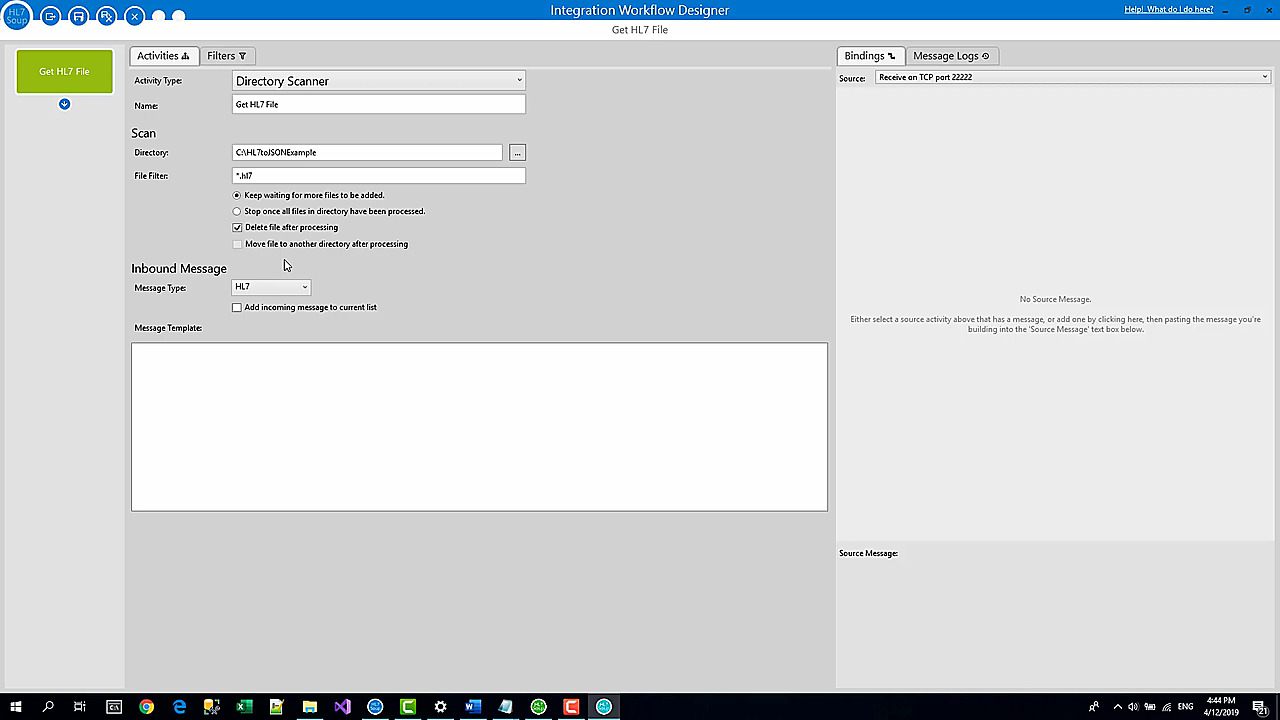
Get HL7 File. - Scan a directory for HL7 files. Configure the source to look in a folder such as
C:\hl7toJSONexample. Keep the message type as HL7 and set the source to wait for more files so the workflow keeps running. - Choose what happens after processing. For a simple demo, delete the input file after it has been processed. In production you may prefer to move processed files into an archive folder.
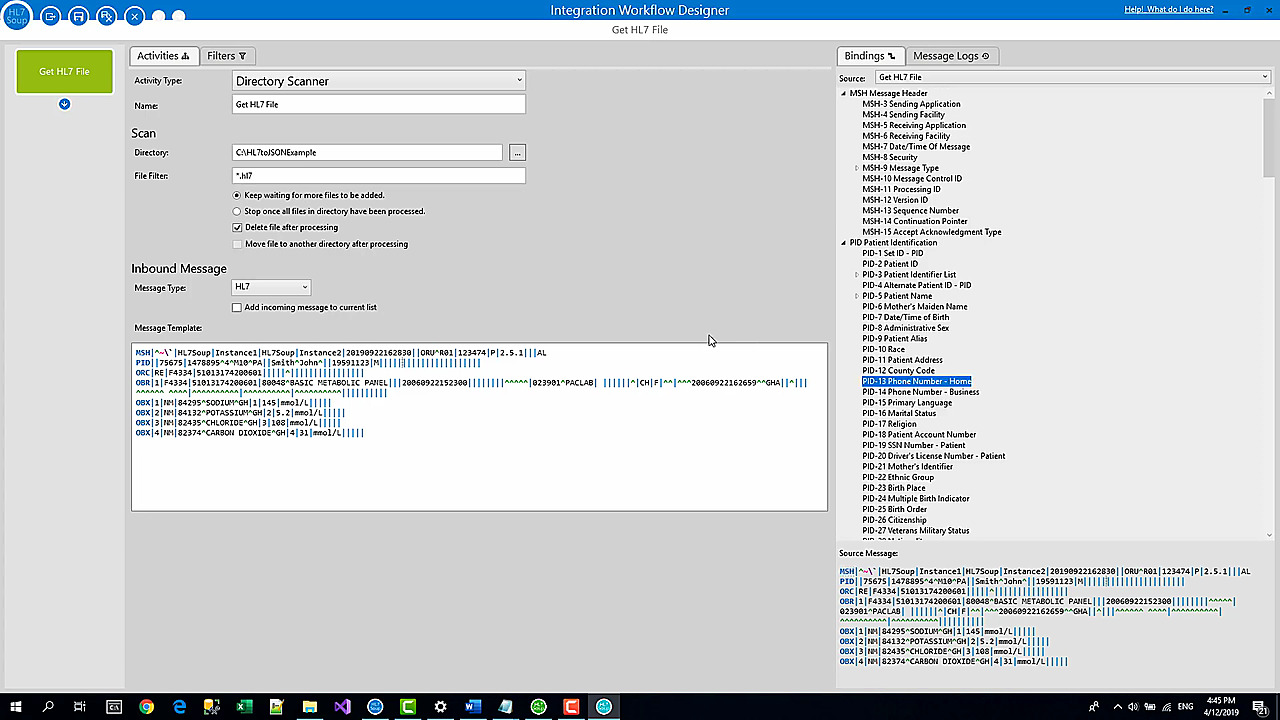
- Paste a sample HL7 message. Add a message template that contains PID fields and OBX results. The tree on the right gives you a clickable map of the HL7 message so you can drag fields into the output.
- Add the output activity. Add a File Writer activity and name it
Create JSON File. Point it at an output folder where the generated JSON files should be written. - Create a unique file name. Drag
MSH-9.1into the file name so the message type becomes part of the name. Insert the current date-time variable, format it with an HL7-style timestamp, and add the.jsonextension. - Set one record per JSON file. Set maximum records for a file to one. JSON files are usually one complete document, not a running append-only stream of unrelated records.
- Build the first JSON template. Start with a small JSON object containing patient ID, first name, last name, and date of birth. Replace the sample values by dragging the matching PID fields into the JSON template.
- Format the date value. Right-click the date of birth binding and use the date/number formatting menu to output a .NET-friendly date format instead of leaving the raw HL7 date untouched.
- Save and run the simple test. Save the workflow, drop an HL7 file into the watched folder, and confirm a JSON file is created in the output folder with the patient values populated.
- Add the repeating results section. Return to the JSON template and add a
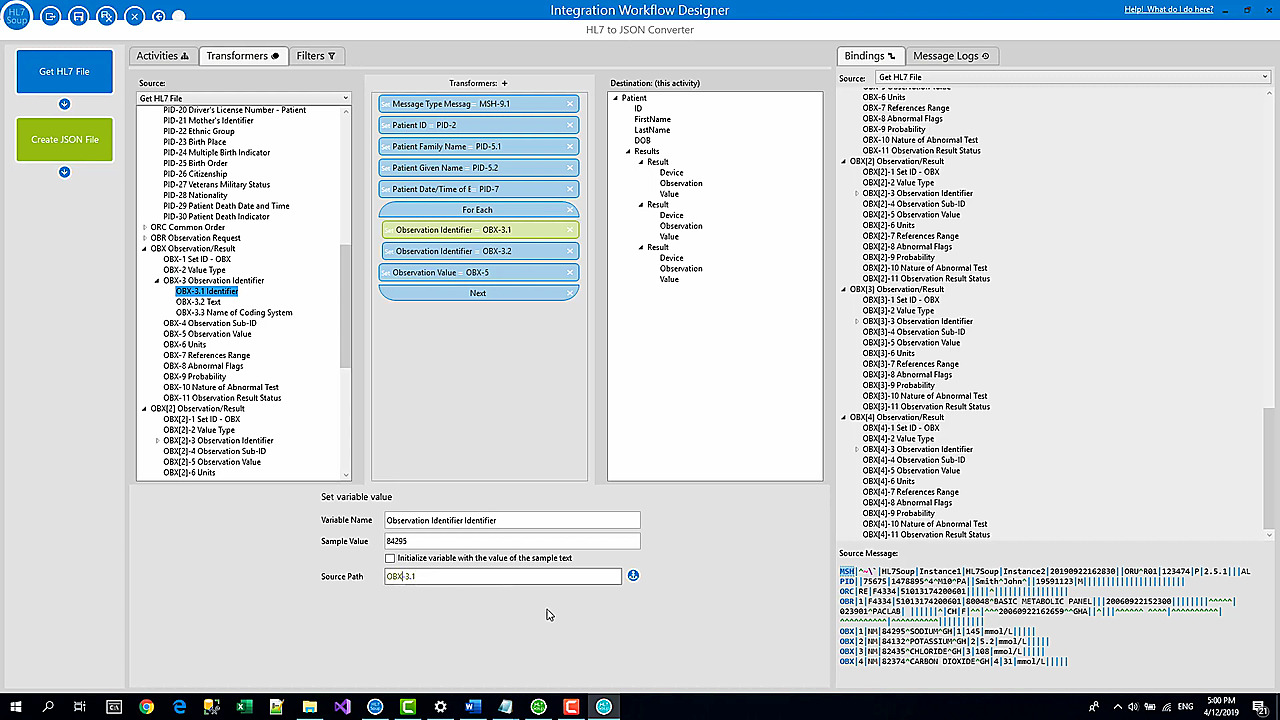
resultsarray. Use one result object as the pattern that will be repeated for every OBX segment. - Create a For Each transformer over OBX. Add a For Each transformer, drag the OBX segment binding into the source path, and make sure the binding text is green. Blue text means literal text, not a real binding.
- Append each OBX result into a variable. Create a
Resultvariable, append the current result object to the existing variable value, and populate fields such as the observation name andOBX-5value. - Remove the last comma. Because JSON does not allow a trailing comma in an array, add a condition and Code activity that trims the final comma from the
Resultvariable before the JSON document is written. - Change the output activity to Text when needed. If the JSON activity complains about the unresolved
${Result}placeholder, change the output message type from JSON to Text. The final content is still JSON text, but Integration Host will no longer try to parse the template before the variable is expanded. - Retest and check the logs. Clear any failed attempts, restart the workflow, drop in another HL7 file, and open the output JSON. The results array should contain every OBX value from the source message, not only the examples from your template.
Looping through repeating OBX results
Direct field mapping works nicely when the input and output have a fixed one-to-one shape. Repeating OBX segments are different. A real lab result message might have one OBX, four OBXs, or dozens of OBXs, so the JSON array needs to be built as the message is processed.
The tutorial uses a Result variable as a growing string. Each loop adds one JSON object and a comma. After the loop, a small code step removes the final comma so the JSON array remains valid.
// truncate the last comma
string result = workflowInstance.GetVariable("Result");
workflowInstance.SetVariable("Result", result.Substring(0, result.Length - 1));
If the source path in the For Each transformer is blue, it is literal text. Drag the OBX binding in as a binding so the transformer loops over the actual repeating OBX segments.
File output is only one destination
The video writes the JSON to a file so the conversion is easy to see. The same JSON message can also be sent to a web service. Replace the File Writer with an HTTP Sender when the JSON should be posted to a REST endpoint, and use the same template or variable content as the request body.
That is often the real reason for converting HL7 to JSON: an older HL7 feed needs to talk to a newer API, service, portal, or integration layer.
Useful checks and troubleshooting
- The JSON file is not created: confirm the workflow is running, the directory path exists, and the source file has been dropped into the watched folder rather than the output folder.
- The same file name is reused: add a current date-time variable or another unique value, such as a message control ID, to the file name.
- Date values look wrong: format HL7 date fields before writing them into JSON, especially when the downstream system expects a .NET or ISO-like date string.
- The For Each loop does not run: check that the OBX source path is a green binding, not blue literal text.
- The JSON parser reports an error around
${Result}: change the output message type to Text after you start inserting a full generated JSON fragment into the template. - The results array has invalid JSON: make sure the final comma is removed from the built-up
Resultvariable before inserting it into the array.
Related tutorials
- Integration Host Getting Started Part One
- Integration Host Getting Started Part Two
- Transforming HL7 data with HL7 Soup
- Add repeating HL7 values to CSV
- Return to the HL7 tutorial directory
Download Free Trial of Integration Host
Video Transcript
Read the full transcript
Hello and welcome to this tutorial where we're going to show you how to convert an HL7 message into a JSON file. This video assumes that you've got some knowledge of HL7, so if you don't, I suggest you have a look at my other HL7 tutorial first and then head back here for the nitty-gritty.
Let's begin. We have our sample HL7 file over on the left, and a sample of what the JSON file will look like once we've finished. They are both in a similar hierarchical structure, but they are not related formats. The bad news is that there is no automatic conversion between these formats. We're going to need to map them.
I'm going to show you how to set up an automatic conversion so all you need to do is drop an HL7 file into a directory and it spits out a JSON file. This is possible because we've got the world's best software to do it, which of course is HL7 Soup's Integration Host.
There's a 30-day free trial so that you can do all this too. Better yet, if you're training, teaching, or just want to have a play, there's also a free development license you can sign up for. It never expires. You just can't use it for live data. Take your pick which license you want to follow along with.
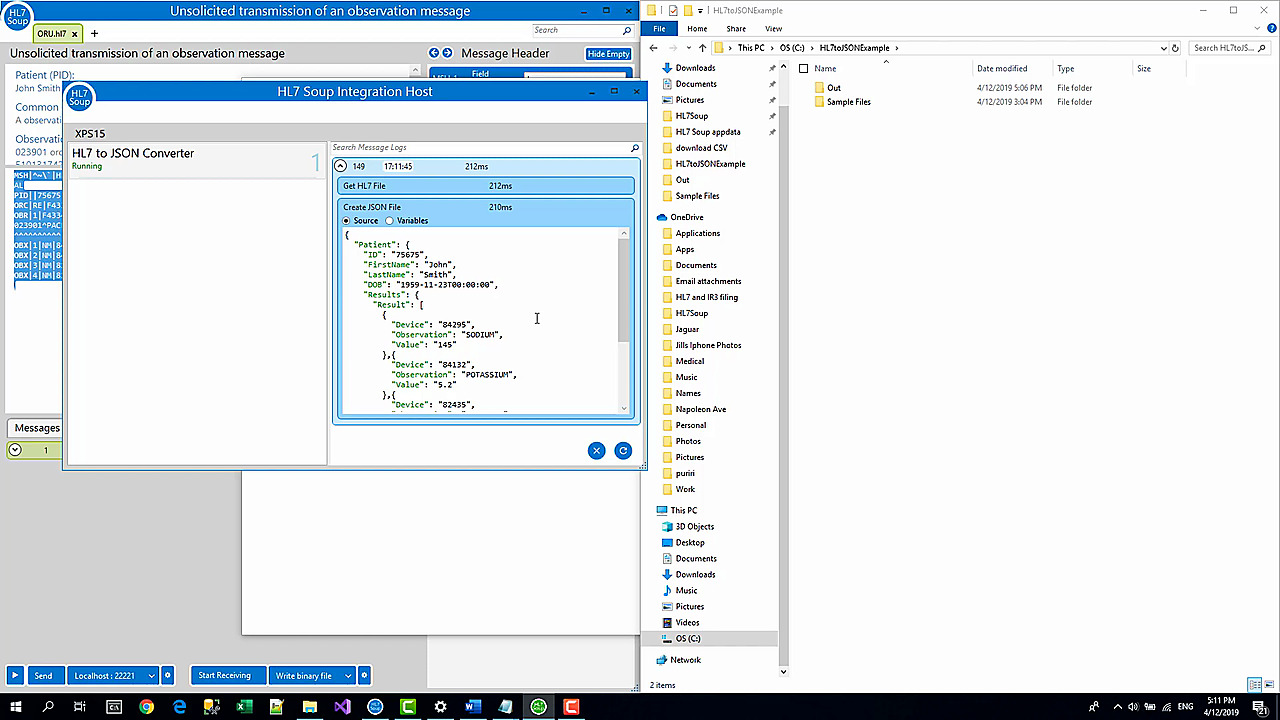
Here it is. This is Integration Host. The main screen is the dashboard used to monitor your conversions, but first we need to create a conversion. You just right-click on the left panel and select New to load up the Workflow Designer and define our conversion.
There is so much you can do with the Workflow Designer that goes well beyond the scope of this tutorial. You can connect all sorts of medical hardware and software together: TCP, web services, databases, all that sort of stuff. If you'd like to know a little bit more about that, take a look at our getting started tutorials in the link at the top right of the video.
For this video, we're going to dive right in. If you recall, we're going to convert from an HL7 file to a JSON file.
First, we need to pick up that file. I'm going to scan for that file, and I'll call this step Get HL7 File. I'm going to search in a directory for a file, and I'm going to have it in C:\hl7toJSONexample.
I'll put that in as my directory. We are looking for HL7 from files, so that filter is already correct. We are going to set it to wait for more files to be added. That just means it will keep processing as files are added, and once a file has been processed we're going to delete it.
We could move it to another directory, but there's no need to do that for this message type. The message type coming in is an HL7 file, and finally we need a message template.
The message template is just an example of what the message is going to look like, so I have this one which I prepared earlier. This is just taken from the HL7 Soup Editor's sample files. I'll paste it in here.
The reason I have it is that it has PID information and a little bit of OBX data too. We're going to use that to show the simple way and perhaps a slightly more complicated conversion as well.
Now that I've pasted it in, we've got a tree over on the right-hand panel. This represents the HL7 message we can see in the message template.
You'll notice that if I click on an item inside the tree, it highlights the exact same place in the message template, and vice versa. If I click on something in the message template, it highlights back in the tree. There's also search message. Another helpful thing to notice is that as you move your mouse over the HL7 message, you automatically get a highlight of where you are inside the message. So you can easily find what you're looking at.
Now we have the message coming in. We need to write it to another directory. I add another activity, and we're going to make this a File Writer.
We'll call this Create JSON File.
Now I have to give it a file name and path. I want to write it out to this out directory, so I'll place that in to help me out. Then I just need to get a file name.
I like to have that file name self-generated, so what I'm going to do is use the message type that was passed into us. That's MSH-9.1. I'm just going to drag that message type into the file name and let it go there. That's created what's called a variable, which is going to be replaced at runtime with the actual message type that the message was.
Then, just to make it unique as well, I'm going to right-click on it and say Insert Variable. I'm going to put in the current date and time, and then .json. I also want to give that current date-time a specific format. The HL7 dates are perfect for file names because they have no funny characters in them.
The maximum records for a file should be one, as this is a JSON file. This should spit out a unique file for each message that we write out.
Do we need to move it to another directory after processing? Again, only if you have some sort of locking issues.
For message type, I'm going to write it out as a JSON file. Now we just need to set the message template.
I've got a cut-down version of our JSON file that I'm going to start with. I just wanted to show you the basics before we go on to the more complicated things.
You can see this JSON file has a patient with the ID, first name, and last name. There are some sample values in there currently. We can replace those values with variables just like we did in the file name.
With that ID, I can navigate to the patient's ID and just drag that into the message. I get the patient's family name, which maps to the last name, the patient's given name, which maps to the first name, and finally their date of birth.
With the date of birth, we are going to want to format that again to a .NET date format.
I'm going to name this workflow, and it's going to be called HL7 to JSON. That's done, so I'm just going to hit Save and Close here.
If we navigate back to Integration Host, we'll see that this converter is sitting there running and ready to go. It has processed zero messages so far, so let's test it out.
I'm going to go into my example directory where I prepared some files already. I've got a sample HL7 file just sitting here, so I'm going to copy the file and drop it into this directory for processing. You can see it has processed that one message. If we now look in the out directory, we're going to see a JSON file. I'll load that up in Notepad, and you can see it has the ID, the first name is John, the last name is Smith, and it has the date of birth in the right format. That's worked perfectly fine.
That was a straightforward example of how to convert from HL7 to JSON. Let's make this a little bit more complicated now. I'll go back to the original file that I had on the screen. You'll see it has the same stuff we've already done: the ID, the first name, and the last name. It also has a group of results, and that's going to make things a bit more complicated.
I will take the result section and copy that back to Integration Host. Double-click on the conversion to open the workflow, head over to the second step, and we will append the result section into the message.
Now we've got the full message. We've still got our variables here bound, and as you can see, what we need to do is produce multiple items.
There are multiple results: one, two, three, and we need to get those out of here. We've got the OBX results we want to get in. You'll notice there are four of them here and three of them here. If it happened to be exactly the same thing, I could just continue mapping like earlier, but in actual fact there could be any number of results, so we're going to have to build those results as we go.
We'll do this via string manipulation. We're going to build this section over and over, and we'll insert those into the message. I'll start by copying one of those, and now we're going to head into what's called the Transformers.
Transformers are steps to convert from one message type to another. On the left-hand panel we've got all the source values, and on the right-hand panel we've got the destination message.
We could have done the patient mapping earlier in here. We could just take the patient ID and drag it into that message, and it creates a binding between those two. But we're not going to use that technique because of the complexities I'm about to show you.
What we're going to do instead is try to loop over all the OBX values in this message. To do that, I click on the bottom transformer and add a new one just below the highlighted one. I add a For Each, because we're going to loop over the OBXs.
I'm going to grab one of those OBX bindings. I'll grab the header of it and drag it into the source path. That's effectively saying I'm going to loop over all the OBX values. Something to watch for here, because I've seen people make this mistake before: there are two options here. If your text is green, that's bound. If Text and Variables were selected, you'll notice that the text would be blue. That would mean a literal OBX text value, so you're not going to be looping over that.
I'll drag in the bindings I'm going to use as the observation. I want the value as well, which is OBX-5. It's going to populate these values in a loop.
We need to create another variable. I'll add it below this one, and I've got a Set Variable Value. I'm going to call this variable Result, and I'm going to add the text that I grabbed from the destination message.
I just need to replace these bits. I'm going to use the observation value. It's going to loop over and build up this text, but of course that would put the same value again into the same variable, so we want to make sure it appends. What we do is put the values that are currently in that variable first.
That's going to build up a list, and then it's going to have a comma after each one. That's good for JSON, except for the very last one. If you've got a comma on the very last one, JSON doesn't like that.
I'll use a little bit of code to do this. I'm going to add a new condition and say if the Result is not empty, run some code.
We will insert a Code activity. Now it's giving you a whole lot of code by default. This is just example code. I open it in the editor, and it's a bit easier to read because you get all the color coding and everything.
We can extract the little bits of code that we want. There's an example here of how to get a variable value, and there's one to set the variable value. Those are the two that we want, so I add this code in.
// truncate the last comma
string result = workflowInstance.GetVariable("Result");
workflowInstance.SetVariable("Result", result.Substring(0, result.Length - 1));
It's just going to remove that last character in the message, which will be the comma.
I need to replace the sample values in the message template and put in my variable for Result.
I'll save and close, and let's try that out. It'll error. You can see things are getting a bit hectic: lots of attempts, lots of failures. I'm just going to stop this and refresh here so you can see the logs.
Logs are beneficial if things are going wrong because you can have a look at the error. You'll see the error message here actually gives us instructions for what we've done wrong.
This is a limitation of the JSON message type. It is very strict about not putting funny characters into the JSON message while it is building that message. What we have to do is really simple. Edit the workflow, go to the second activity, and change the message type from JSON to Text.
We lose all that nice coloring, but it has converted it now for a flat file, so it's no longer going to be parsed by the runtime engine. That means it doesn't mind that it has this random field sitting in the middle of the text.
It didn't mind it for the other values because they were inside quotes, so that's fine. They don't corrupt the JSON syntax. But this dollar sign here did, so that's why it's telling us to convert it to Text.
That's also why I said earlier not to do the direct mappings in the Transformers for HL7 to JSON. I knew I was going to have to convert that JSON message type to plain text, and you can't do the bindings between message types because it doesn't understand those message types.
Now I've got that correct, I'm going to save and close it again. I don't want all this junk, so I'm just going to clear out all the statistics. No messages here, no errors showing. I can just start it up, and it's processed.
We've had one success, so I'm just going to refresh the logs and have a look. Here is our Create JSON File activity, and it has the full value. It is not just the three results that the sample message had. It has populated all the fields correctly, and we've got all the other OBX values. That's worked really well, and that's got the entire conversion going.
Incidentally, this message log that you have here shows about the last thousand messages, give or take. That's useful for diagnosing any problems that you might have.
Another thing that you might want to consider, keeping in mind that this is a JSON file: why do you want a JSON file? It might be that you didn't want to write it out as a file. Perhaps you would be better off sending that off to an HTTP Sender or a web service sender.
Let me just change it to HTTP Sender. Here's our message. You can populate that, and we can use all this to populate a URL and post it off. We can make it Text, and then you could get a response. This is a way it could call your web services or what have you. I haven't actually got a web service or anything that I can call, but I just wanted to give you an idea that that's possible. It doesn't just have to be spat out as a file.
Hopefully that's helpful for someone. Also, did you know that Integration Host UI is all open source? We've got a tutorial showing you how to get this UI and functionality directly into your products, theme it up any way you like.
If this video has helped you, why not return the favor and give us a like? Maybe let us know in the comments what future videos you'd like us to produce. Of course, click the Subscribe button and maybe even ring the bell. Thank you.