
Convert HL7 Messages to XML
What this tutorial builds
This tutorial creates a small Integration Host workflow in HL7 Soup that receives HL7 messages over TCP and writes them out as XML files. The example maps patient values from the inbound HL7 message into a simple patient XML document.
The workflow is deliberately small: receive HL7, write XML, and use transformers to bind values between the two message structures. Once the pattern is working, the same output could be written to disk, passed on to a web service, or adapted for a larger integration workflow.
Before you start
- HL7 Soup and Integration Host installed. The free trial is enough to follow along.
- A sample HL7 message loaded in HL7 Soup. The tutorial uses twelve sample messages.
- A simple XML template that matches the output structure you want to create.
- A local output folder where the File Writer can create the XML files.
- A local test port available. This walkthrough uses port
22222.
The sample XML shape
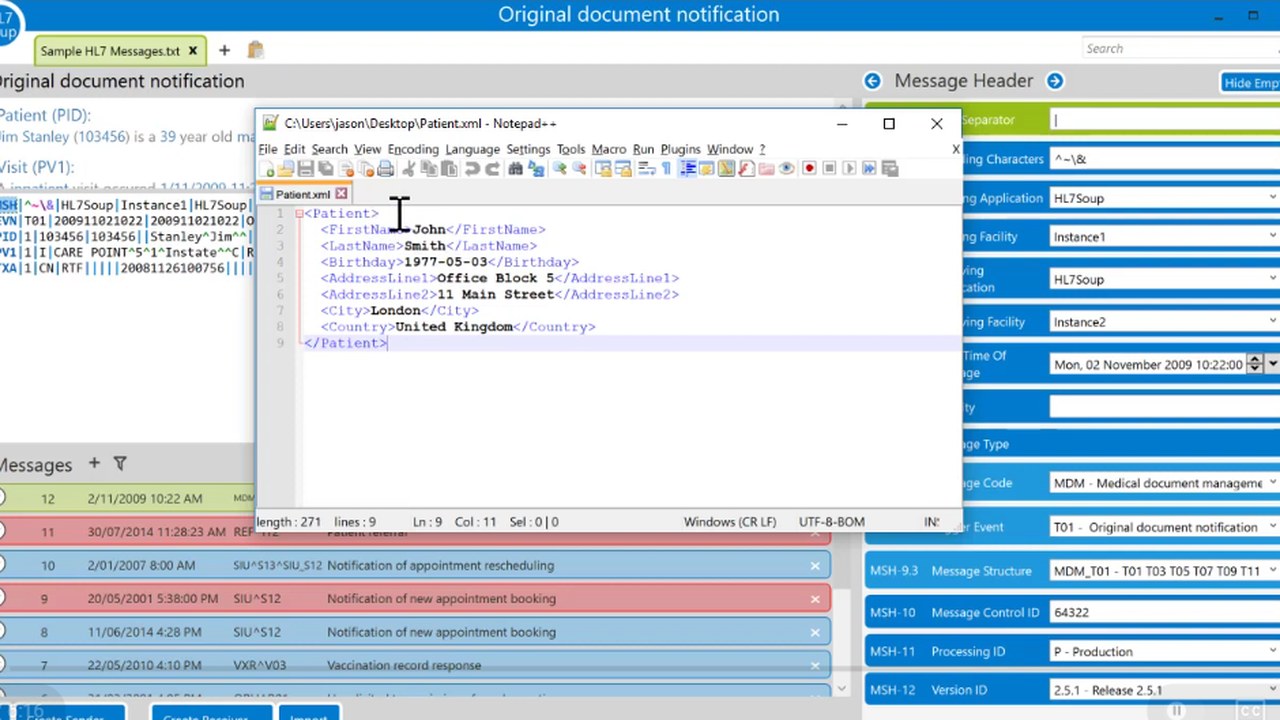
The example keeps the XML intentionally simple so the mapping is easy to see. The destination template represents one patient, with name, birth date, and address fields.
<Patient>
    <FirstName>John</FirstName>
    <LastName>Smith</LastName>
    <Birthday>1977-05-03</Birthday>
    <AddressLine1>Office Block 5</AddressLine1>
    <AddressLine2>11 Main Street</AddressLine2>
    <City>London</City>
    <Country>United Kingdom</Country>
</Patient>
Step-by-step guide
- Open the sample HL7 messages. Start in HL7 Soup with the sample HL7 files loaded. The tutorial uses twelve messages so you can confirm the workflow writes multiple output files, not just one test message.
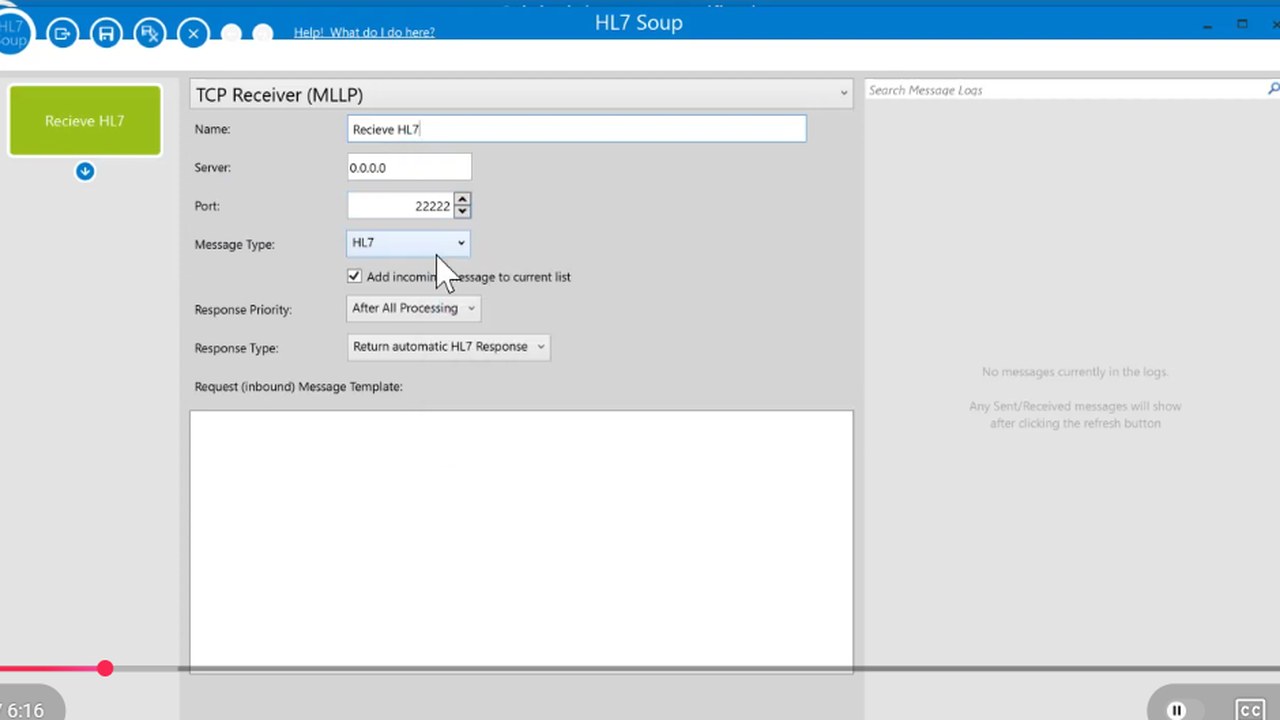
- Create a new receiver. Add a receiver named
Receive HL7. Use TCP as the transport, keep the message type as HL7, and listen on port22222. - Insert the current HL7 message as the template. Right-click the Message Template text box and choose
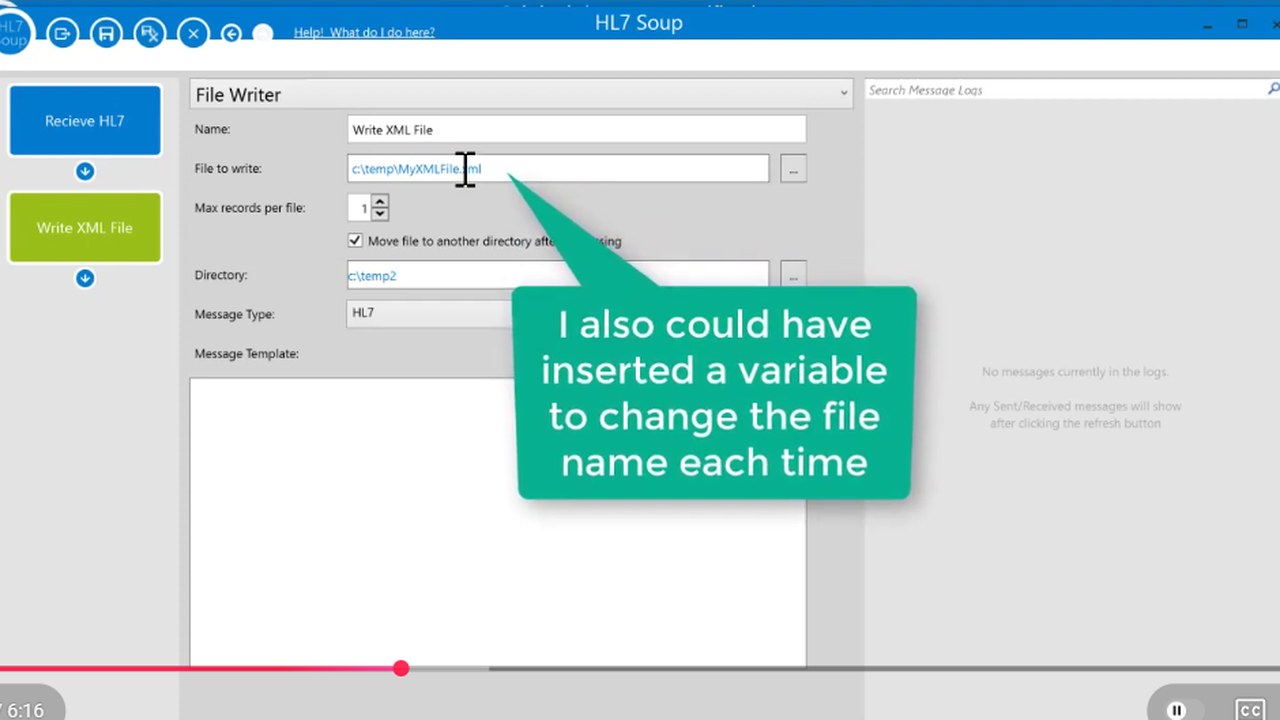
Insert Current Message. This gives the transformer screen a real HL7 structure to work with. - Add a File Writer activity. Add a new activity to the workflow, choose File Writer, and name it
Write XML File. Give it a file name and output path. - Write one XML file per message. Set the File Writer to write one record per file and move the file to another directory after processing. HL7 Soup will keep the file names unique when it copies the files to the final directory.
- Set the output type to XML. Tell the File Writer it is writing XML, then paste your patient XML sample into the destination message template.
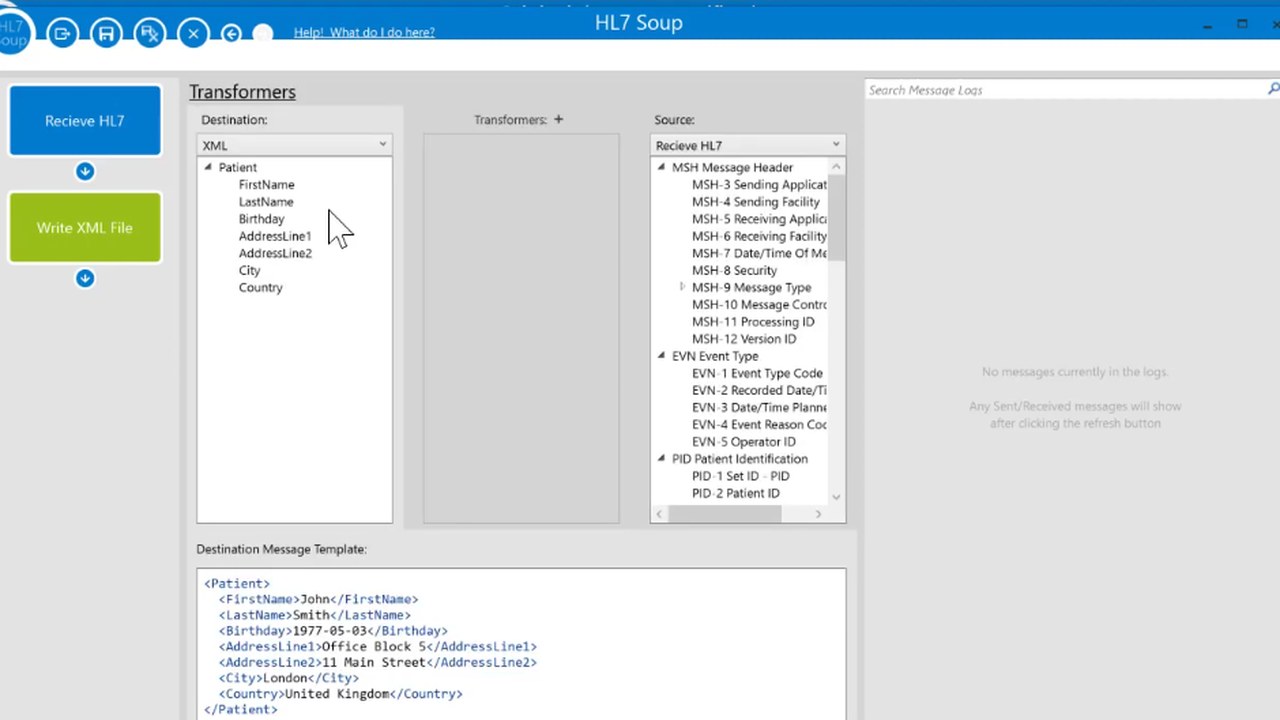
- Open the transformers. Select the
Write XML Fileactivity and open the transformer view. Integration Host turns both templates into trees: the source HL7 message and the destination XML document. - Map HL7 fields into XML elements. Drag the patient's first name from
PID-5.2into the XMLFirstNameelement. Repeat the mapping for family name, birth date, and address fields. The transformer records the HL7 path on the source side and XPath on the XML side. - Save the workflow and start receiving. Save and close the workflow, return to the main HL7 Soup screen, and click Start so the receiver waits for inbound HL7 messages.
- Create a local sender. In HL7 Soup, create a new sender that points to the same local server and port
22222. For the sample run, use rapid move-next processing so all sample messages are sent quickly. - Send all the sample messages. Press Play to send the messages through the receiver. If the last message is selected, let HL7 Soup jump back to the first message before processing the batch.
- Check the XML output files. Open the output directory and confirm one XML file was created for each HL7 message. Open the files in a text editor such as Notepad++ and check that the patient details and address values came from the HL7 messages.
Mapping notes
The tutorial maps a small set of PID values because the point is to show the conversion pattern. Your own XML document can be larger, but it is usually easiest to start with the required fields and add optional fields once the workflow is running.
Use the real HL7 message you expect to receive as the source template. If your trading partner sends patient names, birth dates, or addresses in different repetitions or components, update the bindings before testing the workflow with live-style messages.
Useful checks and troubleshooting
- No XML files are created: confirm the receiver is started and the sender is using the same host and port.
- Files overwrite each other: write one record per file and let the File Writer move the files after processing so each copy gets a unique name.
- XML values are blank: check the transformer source paths. A common mistake is mapping the wrong PID component or using a sample message that does not match the inbound message.
- Dates need a different format: use the formatting options on the transformer binding before writing the value into XML.
- The XML structure needs to change: update the destination XML template first, then revisit the transformer mappings so the new elements appear in the destination tree.
Related tutorials
- Convert XML Messages to HL7
- Convert HL7 Messages to JSON
- Send HL7 messages to Excel / CSV
- Transforming HL7 data with HL7 Soup
- Return to the HL7 tutorial directory
Download 30 Day Free Trial of HL7 Soup
Video Transcript
Read the full transcript
Hello and welcome to this tutorial, where we'll show you how to convert HL7 messages into XML files.
To start with, I'm going to load up the free trial of HL7 Soup so I can grab the sample HL7 files. You can see there are twelve of them ready for me to import, and they are of varying types. What I'm going to convert them to is this XML file here. It's a very basic XML file that represents a patient. I've got the first name and last name of the patient, their birthday information, and their address, so we've kept it nice and simple for the tutorial.
All we have to do now is create a new receiver in HL7 Soup. We're just going to receive a TCP message, which is the standard for HL7. We could also bring it in from a directory scan, but in this case I'm just going to take the default settings. I am going to call it Receive HL7, use the default server, and set the port to 22222. The message type will obviously be HL7, and for the other settings I'm just going to take the defaults.
First of all, I need a message for my message template, which represents the general HL7 message I'm going to be receiving. I'm going to right-click on the Message Template text box and select Insert Current Message. What that's doing is taking the HL7 message from the main screen of HL7 Soup.
That's set up and ready to receive. Now we just need to tell it to send somewhere, so I add a new activity to my workflow and select a File Writer so it writes out to a file. I'm going to rename this activity Write XML File and give it a file name and path. I'm going to ask it to write one record per file, and then I'm going to ask it to move the file to another directory after processing. When HL7 Soup copies the file to the new directory, it automatically makes sure all the files have a unique file name, so it doesn't matter that I've made the XML file names all the same. I'm also going to tell it to write to an XML file.
Now what I need is a template representing our message. For that, I'm going to copy the text from my existing XML message and paste it in.
Great. Now it's going to write out the XML message. All we've got to do is bind the values from that inbound HL7 message and put them into this XML message. We do this by using transformers.
I'm going to click on my Write XML File activity to view the transformers. You'll see it has automatically converted the two message templates into tree views. I can see my patient XML and all of its fields, and my HL7 message and all of its fields. The original messages are also accessible if I click on the trees.
The general goal of transformers is to take the values from the source and map them to values in the destination. Let me show you how that's done. First, I'm going to find my HL7 message patient's first name, which is in PID-5.2, and drag that across to the first name of the XML file. You can see it's created a mapping between the two. It's generated XPath representing the destination XML, and it has HL7 syntax representing the HL7 part.
I repeat this for the other fields. I can drag the family name and map that to the last name, drag the birthday to the date of birth, and map my patient's address to AddressLine1, AddressLine2, City, and Country. That is all the mapping I need, and that's my entire workflow written.
I'm going to save and close this and go back to the main screen of HL7 Soup. We now click to start receiving, and it's sitting there waiting to receive those HL7 messages.
Because I'm just going to send the sample messages that I have in HL7 Soup, I'm going to create a new sender from within HL7 Soup and take all the defaults. The only thing of note is that it's on the same port, 22222, that I was using in the receiver. I've told it to move next every second, and actually I'll tell it to move next rapidly so processing is faster. I can now save and close this.
I could now send individual messages one at a time by clicking the Send button, but instead I'm going to press Play and start sending them all through. Because I had the very last message selected, it's going to ask me to jump back to the first message. I'll say yes, and then they're all processed.
You can see all twelve have been processed very quickly. I can view those now in the temporary directory that I created, and you can see that each has been given a unique file name.
I can now load these files up inside Notepad++. I select them all and open them up, and you'll see each of them has its own details, including the address and whatever was available in those HL7 messages, directly in the XML.
If you found this video helpful, please don't forget to subscribe to my channel. And don't forget, HL7 Soup has a free 30-day trial so you can follow along in these videos. If you found this video helpful, please click the Like button to help me out. Thank you.