
HL7 Tutorial Part Two: Understanding HL7 Message Structure
What this tutorial explains
This second lesson in the HL7 tutorial series explains how to read the structure of an HL7 Version 2 message. The first tutorial showed why HL7 exists. This one moves into the message itself: how lines become segments, how segments are divided into fields, and how values such as a patient's name are split into smaller pieces.
These fundamentals matter before you do any real HL7 integration work. Once you can read paths such as PID-5.2 and PID-5.1.1, you can find, map, validate, transform, and troubleshoot values much more confidently.
The basic HL7 message layers
An HL7 message is plain text, but it has a very specific shape. Each segment is a separate line, and each separator character tells you how far down the message structure you are looking.
| Layer | Separator | Example | What it tells you |
|---|---|---|---|
| Segment | Carriage return | MSH, PID, NK1, PV1 |
A segment is one line of related information, such as message metadata, patient identification, next of kin, or visit details. |
| Field | | |
PID-5 |
A field is a numbered value within a segment. In many HL7 messages, PID-5 is the patient name field. |
| Component | ^ |
PID-5.2 |
A component is a smaller part of a field. For a patient name, PID-5.2 is commonly the given name. |
| Subcomponent | & |
PID-5.1.1 |
A subcomponent is a smaller part of a component. The surname component can be split into surname and surname prefix. |
| Repeat | ~ |
PID-11~PID-11 |
A repeat lets the same field or component occur more than once, such as multiple addresses or phone numbers. |
Start with segments
Every HL7 Version 2 message starts with the message header segment, MSH. This first segment carries message metadata: who sent the message, who should receive it, when it was created, what type of message it is, and which HL7 version is being used.
Other common segments carry the clinical or administrative content. MSA comes back in ACK messages to say whether the original message was accepted, errored, or rejected. EVN describes the trigger event, PID identifies the patient, NK1 can list next-of-kin contacts, PV1 describes visit details, SCH supports scheduling information, ORC describes order control, TQ1 and TQ2 can describe order timing, OBR describes an observation request, OBX carries individual observation results, TXA describes document metadata in MDM messages, and NTE carries notes and comments.
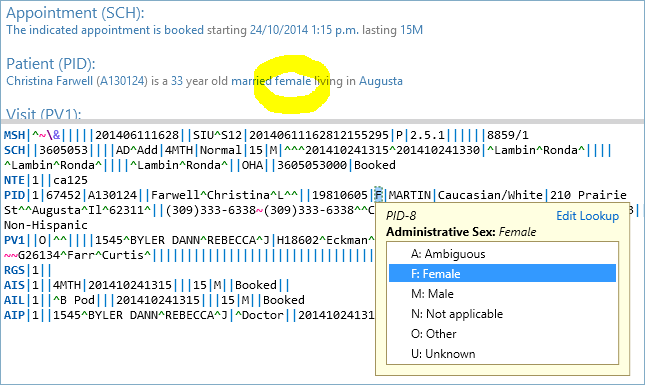
In raw text, the values can look dense. In HL7 Soup, segment headers and separators are highlighted so you can see the structure instead of counting characters by hand.
Fields and paths
Inside a segment, fields are normally separated by the pipe character. A path such as PID-5 means "the fifth field in the PID segment." That field might contain several pieces of a patient's name, so the path can continue into components.
The tutorial uses the patient name as the main example. A value like BROWN^SAM^^^^B is not one flat value. The carets reserve positions for the family name, given name, middle name, suffix, prefix, degree, and name type code. Some positions may be empty, but their separators still matter because the position gives the value its meaning.
PID-5.2 easier to understand.Components and subcomponents
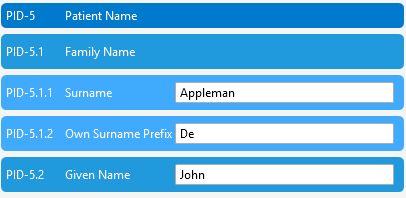
Components use the caret character. For the patient name example, PID-5.1 is the family name component and PID-5.2 is the given name component. If you want Sam's first name from the tutorial message, you would look for PID-5.2.
Some components can be split again into subcomponents with an ampersand. The surname can be represented as PID-5.1.1 for surname and PID-5.1.2 for surname prefix. That is why the tutorial recommends addressing the lowest practical path when you are mapping or transforming data. If the surname can be split, use PID-5.1.1 rather than stopping at PID-5.1.
A good habit: when the value has subcomponents, map the exact subcomponent you need. For a given name, PID-5.2 is usually specific enough. For a surname that can have a prefix, PID-5.1.1 avoids ambiguity.
Repeats
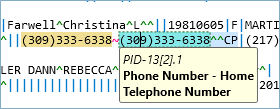
HL7 also allows some fields and components to repeat. A patient may have a home address and a work address, or several phone numbers. Repeat values are separated with the tilde character.
How HL7 Soup helps while you learn
Counting pipes and carets by eye gets old quickly. HL7 Soup shows the same value in several linked places: the raw message editor, the human-readable interpretation, and the segment grid. Clicking a value highlights the matching location and shows a tooltip with the path and description.
Practice on sample messages
Open a few sample HL7 messages in HL7 Soup and deliberately click through the structure. Look for the segment name first, then the field number, then the component and subcomponent. Watch how paths such as PID-5.1, PID-5.2, and PID-11 stay consistent across messages even when the actual values change.
That consistency is what makes HL7 integration possible. Once you know where a value lives, you can validate it, transform it, send it to a database, or use it in an interface workflow.
Related tutorials
- Part 1: What is HL7?
- Part 3: HL7 Message Types of MSH-9
- HL7 segment guide from experience
- HL7 message acknowledgment from experience
- HL7 event type from experience
- HL7 patient additional demographic from experience
- HL7 next of kin from experience
- HL7 patient visit from experience
- HL7 patient allergy information from experience
- HL7 patient adverse reaction information from experience
- HL7 diagnosis from experience
- HL7 insurance from experience
- HL7 insurance additional information from experience
- HL7 guarantor from experience
- HL7 financial transaction from experience
- HL7 common order from experience
- HL7 timing/quantity from experience
- HL7 timing/quantity relationship from experience
- Scheduling over HL7 from experience
- HL7 observation request from experience
- HL7 specimen from experience
- HL7 observation result from experience
- HL7 transcription document header from experience
- HL7 notes and comments from experience
- Introduction to the HL7 Soup Editor
- Validate, highlight, and compare HL7 messages
- Return to the HL7 tutorial directory
Download 30 Day Free Trial of HL7 Soup
Video Transcript
Read the full transcript
Hello and welcome to this second video in the series of HL7 messaging tutorials, where we focus on understanding HL7 message structure.
Let's start with our sample HL7 message from the previous tutorial. I can make out a bit of information here. I can see a couple of names and a country, but I don't really see the context of these.
To explain what's going on, let's simplify this message right down to its most basic element. That's better. Let's imagine that this is our HL7 message.
All HL7 messages are divided up into segments of related information, and these are always separated by a carriage return. Each of these segments is simply a separate line of the message.
The first segment in every HL7 message is always the message header, a segment that conveys the metadata of the message, like who sent it and when. The message header is indicated by the first three letters of the segment: MSH.
In fact, every segment has its own three-letter header that identifies what the segment is about. Some common HL7 segments include PID, which provides patient identification; NK1, a repeatable segment that lists the patient's next of kin; PV1, which provides details of the patient's visit, such as doctors and dates; AL1, which carries patient allergy information; IAM, which carries adverse-reaction updates with identifiers and action codes; IN1, which provides insurance coverage details; SCH, which is for updating appointments in the hospital's schedule; and OBR, which provides details of a group of observation results.
As we delve deeper into the HL7 message structure, we find that segments are themselves divided up into fields. These are normally separated by a pipe character between each of the fields.
Fields each have an assigned value type that relates to their position in the segment. So in this greatly simplified example PID segment, we might find the patient's name at PID-1, their date of birth at PID-2, and details about where they live at PID-3.
Now let's take a look at our actual HL7 message to put what we've learned so far into context.
This is our message loaded into a zoomed section of HL7 Soup. Notice how the pipes are highlighted in blue to help you see the field divisions.
Let's look at how our simplified example fields show in the actual HL7 message. Here we see the PID header, and like all of the segment headers, it is emphasized with a bold blue, making it much easier to distinguish between segment headers and wrapped lines that were longer than would fit without continuing on the following line.
As for the fields, we can see that the real segment holds a lot more data than our simplified sample. But just so you can spot them, here's the patient's name, their date of birth, and their address details.
Now, it's pretty clear that colorful syntax alone doesn't make locating where a field should be any easier, so let's zoom out to the full HL7 Soup window to see what features can help you work with HL7 fields.
Let's start by looking at our segment header. You've seen it shown in the HL7 message editor, but it is also shown in different ways elsewhere in the application. Here it is shown in the interpretation panel, which we learned from the first tutorial gives us a human-readable summary of the message. Here we see it with its official segment name above the segment grid.
We also get similar views of the fields. If we look for the patient's name field, we find it in the interpretation panel, also in the message editor, and in the segments grid.
One of the most helpful features here is that all of these locations are linked together. When I click in the patient's first name, you can see that the first name is highlighted in the HL7 message editor with its own tooltip, which tells you the path to the field, PID.5.2, as well as the field's description.
Over in the segments grid we can see another representation of the patient's name, with each of its components broken up for easier editing, and with the given name highlighted in green because that was the given name component of the patient's name that I clicked.
Let's now take a closer look at the HL7 patient name in a bit more detail. It's pretty easy to spot Sam Brown's name, but what are all those green carets? You may have already guessed that they are field separators. They delimit the patient's name into family name, given name, and in this sample message, a value that specifies the type of name. In this instance it is the patient's birth name.
But what about all those carets between Sam and B? Something is missing. That's because the segment grid is only showing fields that have values. If I click the Show Empty button, we see the grid expand to show fields that don't have any value assigned.
Now we see those carets hold space for the patient's middle name, suffix, prefix, and degree. Let's go back to the diagram now so we can continue looking at what divides the fields up.
We've seen how fields can be broken up into components and how we use a caret to delimit the items in a field. But we can go one step further still, as some components can also be divided up into subcomponents. For instance, the surname can be divided into two, creating a surname and surname prefix subcomponent, and these are delimited by the ampersand character.
Notice how we now have two items representing the patient's surname. The surname field's first subcomponent is also representing a surname. You'll need to be wary of this if you are doing integration work, as addressing these can be a little fiddly.
A common workaround is to address the lowest possible address for the value you are after. For example, in the actual HL7 message you would address the patient's first name as PID-5.2 because there are no subcomponents for a first name value. But you would address the surname as PID-5.1.1 to avoid any confusion between the two possible locations for the surname's value.
Another feature of HL7 messaging is that it allows some fields and components to be repeatable. For instance, you might have two addresses: one for your home and another for your place of work. These can be done by repeating the field with a tilde character between each value.
I suggest you quickly load up HL7 Soup now and go through some of the sample messages to help familiarize yourself with the concepts we've just covered. Take a close look at how location paths, such as PID-5.1, identify where to find values, and notice how these are consistent across all HL7 messages.
Remember, you can download a free 30-day trial of HL7 Soup from www.integrationsoup.com. That will help you through this tutorial series.
In the next lesson, we'll take a closer look at the HL7 event types of MSH-9.